Cheap and Reliable Hosting :: Routing in ASP.NET Web Form Application

IHostAzure.com | Cheap and Reliable ASP.NET Hosting. This article is not dedicated to the basics of routing and its various forms but we will implement the concept of routing in Web Form applications.

I hope you are familiar with routing in MVC applications or at least you know the basic concepts of routing. However, let’s explain routing in a few lines. The fact should be clear, this article is not dedicated to the basics of routing and its various forms but we will implement the concept of routing in Web Form applications.

Sometimes we see a misconception in developer’s minds (mostly young ones) that that routing is only possible in MVC applications. It’s not true in reality. The routing feature is a core concept of ASP.NET and since MVC is built on top of ASP.NET, we can use the concept. But I can say that (I hope most of you will agree with me) the concept of routing became popular in the era of MVC.

However, it does not matter whether the application is in MVC architecture or traditional Web Form application, we can use the concept of routing.

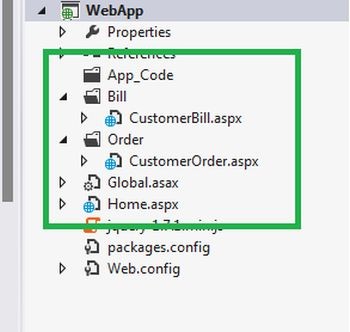
So, let’s create one Web Form application to implement the concept. Here I have created one project structure where I have created two directories called “Bill” and “Order” and kept two .aspx files in both of them. Depending on the route URL the .aspx file will be executed that we will see shortly.

Routing1

Now, add the following code in the Application_start() event of the Global.aspx page. We can see that we made two entries in the RouteTable which is nothing but a key/value collection.

protected void Application_Start(object sender, EventArgs e)
        {
            RouteTable.Routes.MapPageRoute(
                "CustomerOrder",
                "Customer/{id}/Order",
                "~/Order/CustomerOrder.aspx");
            RouteTable.Routes.MapPageRoute(
                "CustomerBill",
                "Customer/{id}/Bill",
                "~/Bill/CustomerBill.aspx");
        }

Let’s discuss the route entry a little bit. The mapping URL strecture will be like the following.

"Customer/{id}/Order", "~/Order/CustomerOrder.aspx"

The “Customer” part is constant in the requested URL and then we will expect a place holder value, here it is “id”. The ‘id” will represent the user’s “id” or something like a primary key. Then again we have kept the constant value which is “Bill” and if the URL pattern is like the following:

Customer/1/Order

Then it will invoke the “customerBill.aspx” page which is located under the “Bill” directory. The procedure is the same for the second entry of the route table.

Now, let’s implement our Order page . Have a look at the following

using System;
using System.Collections.Generic;
using System.Linq;
using System.Web;
using System.Web.UI;
using System.Web.UI.WebControls;

namespace WebApp.Order
{
    public class ClsCustomerOrder
    {
        Dictionary<int, string> Order = new Dictionary<int, string>();
        public ClsCustomerOrder()
        {
            Order.Add(1, "C# Book");
            Order.Add(2, "Java Book");
            Order.Add(3, "PHP Book");
        }
        public string GetOrder(int id)
        {
            return Order[id];
        }
    }

    public partial class CustomerOrder : System.Web.UI.Page
    {
        protected void Page_Load(object sender, EventArgs e)
        {
            string []url = HttpContext.Current.Request.Url.AbsolutePath.Split('/');
            ClsCustomerOrder Order = new ClsCustomerOrder();
            Response.Write("Order by the customer is :-" + Order.GetOrder(Convert.ToInt32(url[2])));

        }
    }
}

 The implementation is very simple, in the page load we are capturing the current URL and from there we are extracting the user name then we are looking up in the dictionary (which is created on another class and working as a Model in this example) to find the user’s order.

Now, I know this Model implementation is not proper and in a real scenario the data may code from the DB or other persistent storage area but we have implemented it to make it simple.

Let’s browse the URL like below.

Routing2Oh, we are getting data from the dictionary and our routing is working fine.
Let’s implement the Billing page now. Here is the code for the Billing page which is very similar to the Order page.

using System;
using System.Collections.Generic;
using System.Linq;
using System.Web;
using System.Web.UI;
using System.Web.UI.WebControls;


namespace WebApp.Bill
{
    public class ClsCustomerBill
    {
        Dictionary<int, int> Order = new Dictionary<int, int>();
        public ClsCustomerBill()
        {
            Order.Add(1,1000);
            Order.Add(2,1500);
            Order.Add(3,2400);
        }
        public int GetOrder(int id)
        {
            return Order[id];
        }
    }
    public partial class CustomerBill : System.Web.UI.Page
    {
        protected void Page_Load(object sender, EventArgs e)
        {
            string[] url = HttpContext.Current.Request.Url.AbsolutePath.Split('/');
            ClsCustomerBill Order = new ClsCustomerBill();
            Response.Write("Bill by the customer is :-" + Order.GetOrder(Convert.ToInt32(url[2])));
        }

    }
}

 We are now browsing below the URL and it will hit the “CustomerBilling.aspx” page and we are getting the following output.

Routing3


Conclusion

In this article we have implemented the concept of routing in Web Form applications. If you were not aware of the previous then I hope you have enjoyed the article. Happy learning.

Best ASP.NET Hosting Recommendation

ASPHostPortal.com

ASPHostPortal.com is the leading provider of Windows hosting and affordable ASP.NET Hosting. ASPHostPortal proudly working to help grow the backbone of the Internet, the millions of individuals, families, micro-businesses, small business, and fledgling online businesses. ASPHostPortal has ability to support the latest Microsoft and ASP.NET technology, such as: WebMatrix, WebDeploy, Visual Studio 2015, .NET 5/ASP.NET 4.5.2, ASP.NET MVC 6.0/5.2, Silverlight 6 and Visual Studio Lightswitch, ASPHostPortal guarantees the highest quality product, top security, and unshakeable reliability, carefully chose high-quality servers, networking, and infrastructure equipment to ensure the utmost reliability.

DiscountService.biz

DiscountService.biz is The Best and Cheap ASP.NET Hosting. DiscountService.biz was established to cater to an under served market in the hosting industry web hosting for customers who want excellent service. DiscountService.biz guarantees the highest quality product, top security, and unshakeable reliability, carefully chose high-quality servers, networking, and infrastructure equipment to ensure the utmost reliability. DiscountService.biz has ability to support the latest Microsoft and ASP.NET technology, such as: WebMatrix, WebDeploy, Visual Studio 2015, .NET 5/ASP.NET 4.5.2, ASP.NET MVC 6.0/5.2, Silverlight 6 and Visual Studio Lightswitch. DiscountService.biz is devoted to offering the best Windows hosting solution for you.

HostForLIFE.eu

HostForLIFE.eu guarantees 99.9% uptime for their professional ASP.NET hosting and actually implements the guarantee in practice. HostForLIFE.eu is the service are excellent and the features of the web hosting plan are even greater than many hosting. HostForLIFE.eu offer IT professionals more advanced features and the latest technology. HostForLIFE.eu has supported ASP.NET 5 hsoting,  Relibility, Stability and Performance of  servers remain and TOP priority. Even basic service plans are equipped with standard service level agreements for 99.99% uptime. Advanced options raise the bar to 99.99%. HostForLIFE.eu revolutionized hosting with Plesk Control Panel, a Web-based interface that provides customers with 24×7 access to their server and site configuration tools.

Cheap and Reliable Hosting :: How to Fix the Error Establishing a Database Connection in WordPress

How to Fix the Error Establishing a Database Connection in WordPress

IHostAzure.com | Cheap and Reliable WordPress Hosting. If you have been surfing the web for a while, you have at least seen this error a few times. Error Establishing a Database Connection is one of those curses that could be caused by many reasons. As a WordPress beginner, this could be awfully frustrating specially when it happened on its own without you changing anything. We ran into this issue yesterday on our own site. It took a little over 20 minutes to detect and fix the problem. While doing the research to find possible causes, we realized that there was no good article that covered everything. In this article, we will show you how to fix the error establishing a database connection in WordPress by compiling a list of solutions all in one place.

Note: Before you make any database changes, make sure you have sufficient backups.

Why do you get this error?

Well in short, you are getting this error because WordPress is unable to establish a database connection. Now the reason why WordPress is unable to establish a database connection can vary. It could be that your database login credentials are wrong or have been changed. It could be that your database server is unresponsive. It could be that your database has been corrupted. In our experience, majority of the times this error happens because of some sort of server error however there could be other factors as well. Lets take a look at how to go about troubleshooting this problem.

Does the problem occur for /wp-admin/ as well?

First thing you should do is to make sure that you are getting the same error on both the front-end of the site, and the back-end of the site (wp-admin). If the error message is the same on both pages “Error establishing a database connection”, then proceed onto the next step. If you are getting a different error on the wp-admin for instance something like “One or more database tables are unavailable. The database may need to be repaired”, then you need to repair your database.

You can do this by adding the following line in your wp-config.php file:

define('WP_ALLOW_REPAIR', true);

Once you have done that, you can see the settings by visiting this page: http://www.yoursite.com/wp-admin/maint/repair.php

dbrepair

Remember, the user does not need to be logged in to access this functionality when this define is set. This is because its main intent is to repair a corrupted database, Users can often not login when the database is corrupt. So once you are done repairing and optimizing your database, make sure to remove this from your wp-config.php.

If this repair did not fix the problem, or you are having trouble running the repair then continue reading this article as you might find another solution to work.

Checking the WP-Config file

WP-Config.php is probably the single most important file in your entire WordPress installation. This is where you specify the details for WordPress to connect your database. If you changed your root password, or the database user password, then you will need to change this file as well. First thing you should always check is if everything in your wp-config.php file is the same.

define('DB_NAME', 'database-name');
define('DB_USER', 'database-username');
define('DB_PASSWORD', 'database-password');
define('DB_HOST', 'localhost');

Remember your DB_Host value might not always be localhost. Depending on the host, it will be different. For popular hosts like ASPHostPortal.com, HostForLIFE.eu, and DiscountService.biz,  it is localhost.

Some folks suggested that they fixed their problem by replacing localhost with the IP. It is common to see this sort of issue when running WordPress on a local server environment. For example on MAMP, the DB_Host value when changed to the IP may seem to work.

define('DB_HOST', '127.0.0.1:8889');

IP’s will vary for online web hosting services.

If everything in this file is correct (make sure you check for typos), then it is fair to say that there is something wrong on the server end.

Check your Web Host (MySQL Server)

Often you will notice this Error establishing database connection when your site gets swarmed with a lot of traffic. Basically, your host server just cannot handle the load (specially when you are on shared hosting). Your site will get really slow and for some users even output the error. So the best thing you should do is get on the phone or livechat with your hosting provider and ask them if your MySQL server is responsive.

For those users who want to test if MySQL server is running yourself, you can do a few things. Test other sites on the same server to see if they are having the issue. If they are also getting the same error, then most definitely there is something wrong with your MySQL server. If you do not have any other site on this same hosting account simply go to your cPanel and try to access phpMyAdmin and connect the database. If you can connect, then we need to verify if your database user has sufficient permission. Create a new file called  testconnection.php and paste the following code in it:

<?php
$link = mysql_connect('localhost', 'root', 'password');
if (!$link) {
die('Could not connect: ' . mysql_error());
}
echo 'Connected successfully';
mysql_close($link);
?>

Make sure to replace the username and password. If the connected successfully, then it means that your user has sufficient permission, and there is something else that is wrong. Go back to your wp-config file to make sure that everything there is correct (re-scan for typos).

If you cannot connect to the database by going to phpMyAdmin, then you know it is something with your server. It does not necessarily means that your MySQL server is down. It could mean that your user does not have sufficient permission.

In our case, our MySQL server was running. All other sites on the servers were working fine except for WPBeginner. When we tried going to our phpMyAdmin, we ended up getting the error:

#1045 – Access denied for user ‘foo’@’%’ (using password: YES)

We got on the phone with ASPHostPortal.com  and their support quickly found the problem. Somehow our user’s permissions were reset. Not sure how that happened, but apparently that was the reason. They went back in and restore the permissions and we were able to get the site back live.

So if you get the access denied error in either connecting to your phpMyAdmin or through testconnection.php results, then you should contact your host right away to get them to fix it.

Cheap and Reliable Hosting :: TIPS for Ajax Developers in ASP.NET MVC

IHostAzure.com | Cheap and reliable ASP.NET MVC hosting. This is another quick blog post for the ASP.NET developers, who’re using ajax (or are going to use the ajax in their applications for async calls for the data to the server), and might be getting confused in the View-part of the MVC pattern. This blog post, would try to tip them up with a simple method of creating ajax functionality in their applications, and how to get the confusion about View-part clear. The background to this post is a question, that arose, of how to use the ajax to get the data in ASP.NET MVC framework. Although that was a simple task, but I know new developers get into trouble in making the logic, that is why I am writing this blog post, to explain the core-concept of the behaviour.

Getting hands dirty in some ASP.NET code

First stage would be to write the back-end code for our application, which is the ASP.NET MVC application. Wait, the first thing I want to elaborate here is that ajax requests don’t usually require you to send entire HTML markup, to be rendered. Usually, ajax requests are used to download just a few details about the user, such as their name, their company name, or a little message such as success message for the process user has started. That is why, sending entire HTML markup would take a lot of time, and network size, by sending entire XML tree as HTML markup.

asp.net2.jpgThat is why, I am going to not-create any View in this project. But I am going to work with just a single Controller. That controller would be used to perform all of the actions, and after the controller has been made, I am going to use the Route mechanism to allow custom URLs in  application; which do not map to our actual HTML files on the application set up. Don’t worry, as the application would build up, the concept of this paragraph would start to get some gravity and you will understand it how did I do and what you would do in order to create your own Ajax running ASP.NET MVC application.

First of all, let us create a Controller. To create a controller, you can get some help from Visual Studio, click on the Controllers folder and Add Controller to it. Name it, what so ever you want to. I named it as AjaxController; to specify that it would control all of the ajax requests over HTTP protocol. Once that has been done, you can create your own action methods that would response to your own personal functions. I didn’t bother creating any complex task, instead I just simply created a function, named it as “CustomAction”. It would be used as the URL to our ajax handling web page.

Inside that page, you would write the following code, to handle it and provide the result to it. Like simple C# application, the functions can have any return data type and thus, in ASP.NET MVC application we can, instead of a View, return a string (or any other data type object) that would be sent down to the client as the response to his ajax request. It would be much simpler, and much shorter in structure.

using System;
using System.Collections.Generic;
using System.Linq;
using System.Web;
using System.Web.Mvc;

namespace AjaxRequests_in_ASPNET_MVC.Controllers
{
   public class AjaxController : Controller
   {
      // GET: Ajax
      public string Index()
      {
         return "Not allowed";
      }

      // Our custom action, URL would be /ajax/customaction
      public string CustomAction()
      {
         // We're going to return a string, not a view.
         return "Hello world, using Ajax in ASP.NET MVC application.";
      }
   }
}

The above code would return a string, that can be then used as a response and rendered into the HTML or done what-so-ever with it.

Now let us change the routes to actually let the application run without having to use a web page that is a View inside the Ajax folder in our Views folder. Open the App_Start folder, and inside there open the RouteConfig file, and inside it. Write this new route.MapPath() function

// Create a new route, set the controller to "Ajax" and the remaining would be the Action
// Note that there are no Views in the Views folder to map to this location.
routes.MapRoute(
   name: "AjaxController",
   url: "Ajax/{action}",
   defaults: new {controller = "Ajax"}
);

Now this code would create a routing scheme in your application, and is able to let your application run without actually having to have a specific file at that location to run and handle the ajax request. In the above code, I am using the URLs of the type “/ajax/customajax“, in this URL ajax is a constant string value, used as a path, and then the customajax would be the action of the controller. When this URL would be called, ASP.NET would execute the CustomAjax action of the controller, and would return the string result inside the function.

TIPS for Ajax Developers in ASP.NET MVC

Performing the ajax code

The ajax code for this project is simple jQuery code to create an async request to the server, to download some more data. But before I share the code for the ajax request, I would like you to make a few changes in the _Layout.cshtml file of your project. The change is to include the jQuery library in the project, so that in the web page you can use the jQuery (because we will be using that layout). Add this line of code to your HTML markup’s <head> element.

<script src="~/Scripts/jquery-1.10.2.js"></script>

Now that the jQuery has been added to your HTML DOM, you can use this library in other pages which has this page set as their layouts, to make use of the jQuery syntax and other objects. I will be using the ajax.

The following code depicts the code used for an example ajax request

$(document).ready(function () {
   $.ajax({
      // The URL
      url: "ajax/customaction",
      // If the request was successfull; which will be, if it is not successfull check for errors
      success: function (data) {
         // Alert the data; it would be "Hello world, using Ajax in ASP.NET MVC application."
        alert(data);
      }
   });
});

Now once this code would run, it would try to make a call to the URL specified, in the above section we discussed how ASP.NET would handle that request using the routings and action methods, and then would return a single string value. It would finally alert the user with the string that would be returned. That would be a single ajax running application, which would return simple plain message to the user without any complex and large sized View.


No #1 Recommended ASP.NET MVC Hosting

ASPHostPortal.com

ASPHostPortal.com  is the leading provider of Windows hosting and affordable ASP.NET  MVC Hosting. ASPHostPortal proudly working to help grow the backbone of the Internet, the millions of individuals, families, micro-businesses, small business, and fledgling online businesses. ASPHostPortal has ability to support the latest Microsoft and ASP.NET technology, such as: WebMatrix, WebDeploy, Visual Studio 2015, .NET 5/ASP.NET 4.5.2, ASP.NET MVC 6.0/5.2, Silverlight 6 and Visual Studio Lightswitch, ASPHostPortal guarantees the highest quality product, top security, and unshakeable reliability, carefully chose high-quality servers, networking, and infrastructure equipment to ensure the utmost reliability.

HostForLIFE.eu

HostForLIFE.eu guarantees 99.9% uptime for their professional ASP.NET MVC hosting and actually implements the guarantee in practice. HostForLIFE.eu is the service are excellent and the features of the web hosting plan are even greater than many hosting. HostForLIFE.eu offer IT professionals more advanced features and the latest technology. Relibility, Stability and Performance of  servers remain and TOP priority. Even basic service plans are equipped with standard service level agreements for 99.99% uptime. Advanced options raise the bar to 99.99%. HostForLIFE.eu revolutionized hosting with Plesk Control Panel, a Web-based interface that provides customers with 24×7 access to their server and site configuration tools.

DiscountService.biz

DiscountService.biz is The Best and Cheap ASP.NET MVC Hosting. DiscountService.biz was established to cater to an under served market in the hosting industry web hosting for customers who want excellent service. DiscountService.biz guarantees the highest quality product, top security, and unshakeable reliability, carefully chose high-quality servers, networking, and infrastructure equipment to ensure the utmost reliability. DiscountService.biz has ability to support the latest Microsoft and ASP.NET technology, such as: WebMatrix, WebDeploy, Visual Studio 2015, .NET 5/ASP.NET 4.5.2, ASP.NET MVC 6.0/5.2, Silverlight 6 and Visual Studio Lightswitch. DiscountService.biz is devoted to offering the best Windows hosting solution for you.


Cheap and Reliable Hosting :: How To Draw Route Between Current Location and Destination On Google Maps in ASP.NET

IHostAzure.com | Cheap and Reliable ASP.NET Hosting. Today I will explains about how to draw route between current location and destination on google maps in ASP.NET. Let me to show you.

Please following this code

The following is my aspx:

<%@ Page Language="C#" AutoEventWireup="true" CodeFile="Default.aspx.cs" Inherits="_Default" %>  
<!DOCTYPE html PUBLIC "-//W3C//DTD XHTML 1.0 Transitional//EN" "http://www.w3.org/TR/xhtml1/DTD/xhtml1-transitional.dtd">  
<html xmlns="http://www.w3.org/1999/xhtml">  
<head runat="server">  
    <title>Search Route Direction</title>  
    <script type="text/javascript" src="https://maps.googleapis.com/maps/api/js?sensor=false"></script>  
    <script type="text/javascript" src="https://maps.googleapis.com/maps/api/js?key=AIzaSyC6v5-2uaq_wusHDktM9ILcqIrlPtnZgEk&sensor=false">  
    </script>  
    <%--Getting User Current Location--%>  
    <script type="text/javascript">  
        if (navigator.geolocation) {  
            navigator.geolocation.getCurrentPosition(success);  
        } else {  
            alert("There is Some Problem on your current browser to get Geo Location!");  
        }  
        function success(position) {  
            var lat = position.coords.latitude;  
            var long = position.coords.longitude;  
            var city = position.coords.locality;  
            var LatLng = new google.maps.LatLng(lat, long);  
            var mapOptions = {  
                center: LatLng,  
                zoom: 12,  
                mapTypeId: google.maps.MapTypeId.ROADMAP  
            };  
            var map = new google.maps.Map(document.getElementById("MyMapLOC"), mapOptions);  
            var marker = new google.maps.Marker({  
                position: LatLng,  
                title: "<div style = 'height:60px;width:200px'><b>Your location:</b><br />Latitude: "  
                            + lat + +"<br />Longitude: " + long  
            });  
            marker.setMap(map);  
            var getInfoWindow = new google.maps.InfoWindow({ content: "<b>Your Current Location</b><br/> Latitude:" +  
                                    lat + "<br /> Longitude:" + long + ""  
            });  
            getInfoWindow.open(map, marker);  
        }  
    </script>  
    <%--Getting Route Direction From User Current Location to Destination--%>  
    <script type="text/javascript">  
        function SearchRoute() {  
            document.getElementById("MyMapLOC").style.display = 'none';  
  
            var markers = new Array();  
            var myLatLng;  
  
            //Find the current location of the user.  
            if (navigator.geolocation) {  
                navigator.geolocation.getCurrentPosition(function(p) {  
                    var myLatLng = new google.maps.LatLng(p.coords.latitude, p.coords.longitude);  
                    var m = {};  
                    m.title = "Your Current Location";  
                    m.lat = p.coords.latitude;  
                    m.lng = p.coords.longitude;  
                    markers.push(m);  
                    //Find Destination address location.  
                    var address = document.getElementById("txtDestination").value;  
                    var geocoder = new google.maps.Geocoder();  
                    geocoder.geocode({ 'address': address }, function(results, status) {  
                        if (status == google.maps.GeocoderStatus.OK) {  
                            m = {};  
                            m.title = address;  
                            m.lat = results[0].geometry.location.lat();  
                            m.lng = results[0].geometry.location.lng();  
                            markers.push(m);  
                            var mapOptions = {  
                                center: myLatLng,  
                                zoom: 4,  
                                mapTypeId: google.maps.MapTypeId.ROADMAP  
                            };  
                            var map = new google.maps.Map(document.getElementById("MapRoute"), mapOptions);  
                            var infoWindow = new google.maps.InfoWindow();  
                            var lat_lng = new Array();  
                            var latlngbounds = new google.maps.LatLngBounds();  
                            for (i = 0; i < markers.length; i++) {  
                                var data = markers[i];  
                                var myLatlng = new google.maps.LatLng(data.lat, data.lng);  
                                lat_lng.push(myLatlng);  
                                var marker = new google.maps.Marker({  
                                    position: myLatlng,  
                                    map: map,  
                                    title: data.title  
                                });  
                                latlngbounds.extend(marker.position);  
                                (function(marker, data) {  
                                    google.maps.event.addListener(marker, "click", function(e) {  
                                        infoWindow.setContent(data.title);  
                                        infoWindow.open(map, marker);  
                                    });  
                                })(marker, data);  
                            }  
                            map.setCenter(latlngbounds.getCenter());  
                            map.fitBounds(latlngbounds);  
                            //***********ROUTING****************//  
                            //Initialize the Path Array.  
                            var path = new google.maps.MVCArray();  
                            //Getting the Direction Service.  
                            var service = new google.maps.DirectionsService();  
                            //Set the Path Stroke Color.  
                            var poly = new google.maps.Polyline({ map: map, strokeColor: '#4986E7' });  
                            //Loop and Draw Path Route between the Points on MAP.  
                            for (var i = 0; i < lat_lng.length; i++) {  
                                if ((i + 1) < lat_lng.length) {  
                                    var src = lat_lng[i];  
                                    var des = lat_lng[i + 1];  
                                    path.push(src);  
                                    poly.setPath(path);  
                                    service.route({  
                                        origin: src,  
                                        destination: des,  
                                        travelMode: google.maps.DirectionsTravelMode.DRIVING  
                                    }, function(result, status) {  
                                        if (status == google.maps.DirectionsStatus.OK) {  
                                            for (var i = 0, len = result.routes[0].overview_path.length; i < len; i++) {  
                                                path.push(result.routes[0].overview_path[i]);  
                                            }  
                                        } else {  
                                            alert("Invalid location.");  
                                            window.location.href = window.location.href;  
                                        }  
                                    });  
                                }  
                            }  
                        } else {  
                            alert("Request failed.")  
                        }  
                    });  
                });  
            }  
            else {  
                alert('Some Problem in getting Geo Location.');  
                return;  
            }  
        }  
    </script>   
</head>  
<body>  
    <form id="form1" runat="server">  
    <table style="border: solid 15px blue; width: 100%; vertical-align: central;">  
        <tr>  
            <td style="padding-left: 20px; padding-top: 20px; padding-bottom: 20px; background-color: skyblue;  
                text-align: center; font-family: Verdana; font-size: 20pt; color: Green;">  
                Draw Route Between User's Current Location & Destination On Google Map  
            </td>  
        </tr>  
        <tr>  
            <td style="background-color: skyblue; text-align: center; font-family: Verdana; font-size: 14pt;  
                color: red;">  
                <b>Enter Destination:</b>  
                <input type="text" id="txtDestination" value="" style="width: 200px" />  
                <input type="button" value="Search Route" onclick="SearchRoute()" />  
            </td>  
        </tr>  
        <tr>  
            <td>  
                <div id="MyMapLOC" style="width: 550px; height: 470px">  
                </div>  
                <div id="MapRoute" style="width: 500px; height: 500px">  
                </div>  
            </td>  
        </tr>  
    </form>  
</body>  
</html>

 Now run the application.

I hope this article helpful for you. Happy Coding 🙂

Best Recommendation ASP.NET 5 Hosting

ASPHostPortal.com

asp

Cheap and Reliable Hosting :: How to Send Mail to Multiple Users Using Parallel Programming in ASP.NET

How to Send Mail to Multiple Users Using Parallel Programming in ASP.NET

IHostAzure.com| cheap and reliable ASP.NET 5 Hosting. Hi guys today I will sharing code about how to Send Mail to Multiple Users Using Parallel Programming in ASP.NET C#. Ok let me to show you.

The following is the table design from where I am fetching employee records.

Code

CREATE TABLE [dbo].[Employee](  
    [Emp_ID] [int] IDENTITY(1,1) NOT NULL,  
    [Name] [varchar](50) NULL,  
    [Email] [varchar](500) NULL,  
    [Designation] [varchar](50) NULL,  
    [City] [varchar](50) NULL,  
    [State] [varchar](50) NULL,  
    [Country] [varchar](50) NULL,  
 CONSTRAINT [PK_Employee] PRIMARY KEY CLUSTERED   
(  
    [Emp_ID] ASC  
)WITH (PAD_INDEX  = OFF, STATISTICS_NORECOMPUTE  = OFF, IGNORE_DUP_KEY = OFF, ALLOW_ROW_LOCKS  = ON, ALLOW_PAGE_LOCKS  = ON) ON [PRIMARY]  
) ON [PRIMARY]  
  
GO 

 The following is my aspx:

<%@ Page Language="C#" AutoEventWireup="true" CodeBehind="Default.aspx.cs" Inherits="SendMailToMultipleUsers.Default" %>  
<!DOCTYPE html>  
<html xmlns="http://www.w3.org/1999/xhtml">  
<head runat="server">  
    <title>Send Mail To Multiple Users in ASP.NET C#</title>  
</head>  
<body>  
    <form id="form1" runat="server">  
        <div>  
            <table style="border: solid 15px blue; width: 100%; vertical-align: central;">  
                <tr>  
                    <td style="padding-left: 50px; padding-top: 20px; padding-bottom: 20px;   
                            background-color: skyblue; font-size: 20pt; color: orangered;">  
                        Send Mail To Multiple Users in ASP.NET C#  
                    </td>  
                </tr>  
                <tr>  
                    <td style="text-align: left; padding-left: 50px; border: solid 1px red;">  
                        <asp:GridView ID="GridViewEmployee" runat="server" AutoGenerateColumns="False" Width="90%"  
                            BackColor="White" BorderColor="#3366CC" BorderStyle="None" BorderWidth="1px"  
                            CellPadding="4" GridLines="Both">  
                            <Columns>  
                                <asp:TemplateField HeaderText="Select">  
  
                                    <ItemTemplate>  
                                        <asp:CheckBox ID="chkSelect" runat="server" />  
                                    </ItemTemplate>  
                                </asp:TemplateField>  
                                <asp:BoundField DataField="Name" HeaderText="Employee Name" />  
                                <asp:BoundField DataField="Email" HeaderText="Email" />  
                                <asp:BoundField DataField="Designation" HeaderText="Designation" />  
                                <asp:BoundField DataField="City" HeaderText="City" />  
                                <asp:BoundField DataField="State" HeaderText="State" />  
                                <asp:BoundField DataField="Country" HeaderText="Country" />  
                            </Columns>  
                            <FooterStyle BackColor="#99CCCC" ForeColor="#003399" />  
                            <HeaderStyle BackColor="#003399" Font-Bold="True" ForeColor="#CCCCFF" />  
                            <PagerStyle BackColor="#99CCCC" ForeColor="#003399" HorizontalAlign="Left" />  
                            <RowStyle BackColor="White" ForeColor="#003399" />  
                            <SelectedRowStyle BackColor="#009999" Font-Bold="True" ForeColor="#CCFF99" />  
                        </asp:GridView>  
                    </td>  
                </tr>  
                <tr>  
                    <td align="right">  
                        <asp:Button ID="btnSendMail" Text="Send Mail" OnClick="btnSendMail_Click" runat="server" />  
                    </td>  
                </tr>  
            </table>  
        </div>  
    </form>  
</body>  
</html> 
using System;  
using System.Collections.Generic;  
using System.Linq;  
using System.Web;  
using System.Web.UI;  
using System.Web.UI.WebControls;  
using System.Data;  
using System.Data.SqlClient;  
using System.Net.Mail;  
using System.Net;  
using System.Threading.Tasks;  
  
namespace SendMailToMultipleUsers  
{  
    public partial class Default : System.Web.UI.Page  
    {  
        SqlDataAdapter da;  
        DataSet ds = new DataSet();  
        DataTable dt = new DataTable();  
  
        protected void Page_Load(object sender, EventArgs e)  
        {  
            if (!Page.IsPostBack)  
                this.BindGrid();  
        }  
  
        private void BindGrid()  
        {  
            SqlConnection con = new SqlConnection();  
            ds = new DataSet();  
            con.ConnectionString = @"Data Source=INDIA\MSSQLServer2k8; Initial Catalog=EmployeeManagement; Uid=sa; pwd=india;";  
            SqlCommand cmd = new SqlCommand("SELECT * FROM EMPLOYEE", con);  
  
            da = new SqlDataAdapter(cmd);  
            da.Fill(ds);  
            con.Open();  
            cmd.ExecuteNonQuery();  
            con.Close();  
  
            if (ds.Tables[0].Rows.Count > 0)  
            {  
                GridViewEmployee.DataSource = ds.Tables[0];  
                GridViewEmployee.DataBind();  
            }  
        }  
  
        protected void btnSendMail_Click(object sender, EventArgs e)  
        {  
            DataTable dt = new DataTable();  
            dt.Columns.AddRange(new DataColumn[2] { new DataColumn("Name", typeof(string)),  
                        new DataColumn("Email",typeof(string)) });  
  
  
            foreach (GridViewRow row in GridViewEmployee.Rows)  
            {  
                if ((row.FindControl("chkSelect") as CheckBox).Checked)  
                {  
                    dt.Rows.Add(row.Cells[1].Text, row.Cells[2].Text);  
                }  
            }  
  
  
            string body = "Hi This is test Mail.<br /><br />Thanks.";  
  
  
            Parallel.ForEach(dt.AsEnumerable(), row =>  
            {  
                SendEmail(row["Email"].ToString(), row["Name"].ToString(), body);  
            });  
        }  
  
        private bool SendEmail(string To, string ToName, string body)  
        {  
            try  
            {  
                MailMessage mm = new MailMessage("yourEmailID@gmail.com", To);  
                mm.Subject = "Welcome " + ToName;  
                mm.Body = body;  
                mm.IsBodyHtml = true;  
                SmtpClient smtp = new SmtpClient();  
                smtp.Host = "smtp.gmail.com";  
                smtp.EnableSsl = true;  
                NetworkCredential NetworkCred = new NetworkCredential();  
                NetworkCred.UserName = "yourEmailID@gmail.com";  
                NetworkCred.Password = "<YourGmailPassword>";  
                smtp.UseDefaultCredentials = true;  
                smtp.Credentials = NetworkCred;  
                smtp.Port = 587;  
                smtp.Send(mm);  
                return true;  
            }  
            catch (Exception ex)  
            {  
                return false;  
            }  
        }  
    }  
}

 Happy Coding

Cheap and Reliable ASP.NET 5 Hosting 2015

ASPHostPortal.com

ASPHostPortal.com is the leading provider of Windows hosting and affordableASP.NET 5 Hosting. ASPHostPortal proudly working to help grow the backbone of the Internet, the millions of individuals, families, micro-businesses, small business, and fledgling online businesses. ASPHostPortal has ability to support the latest Microsoft and ASP.NET technology, such as: WebMatrix, WebDeploy, Visual Studio 2015, .NET 5/ASP.NET 4.5.2, ASP.NET MVC 6.0/5.2, Silverlight 6 and Visual Studio Lightswitch, ASPHostPortal guarantees the highest quality product, top security, and unshakeable reliability, carefully chose high-quality servers, networking, and infrastructure equipment to ensure the utmost reliability.

HostForLIFE.eu

HostForLIFE.eu guarantees 99.9% uptime for their professional ASP.NET 5 hosting and actually implements the guarantee in practice. HostForLIFE.eu is the service are excellent and the features of the web hosting plan are even greater than many hosting. HostForLIFE.eu offer IT professionals more advanced features and the latest technology. HostForLIFE.eu has supported  ASP.NET 5,  Relibility, Stability and Performance of  servers remain and TOP priority. Even basic service plans are equipped with standard service level agreements for 99.99% uptime. Advanced options raise the bar to 99.99%. HostForLIFE.eu revolutionized hosting with Plesk Control Panel, a Web-based interface that provides customers with 24×7 access to their server and site configuration tools.

DiscountService.biz

DiscountService.biz is The Best and Cheap ASP.NET 5 Hosting. DiscountService.biz was established to cater to an under served market in the hosting industry web hosting for customers who want excellent service. DiscountService.biz guarantees the highest quality product, top security, and unshakeable reliability, carefully chose high-quality servers, networking, and infrastructure equipment to ensure the utmost reliability. DiscountService.biz has ability to support the latest Microsoft and ASP.NET technology, such as: WebMatrix, WebDeploy, Visual Studio 2015, .NET 5/ASP.NET 4.5.2, ASP.NET MVC 6.0/5.2, Silverlight 6 and Visual Studio Lightswitch. DiscountService.biz is devoted to offering the best Windows hosting solution for you.

Cheap and Reliable Hosting :: How To Upgrade Composite C1 4.2

IHostAzure.com | Cheap and Reliable Composite C1 4.2 hosting. Composite C1 is recognized for being an easy-to-use professional system that fulfils the needs of hardcore developers, but remains accessible to editors. Out of the box users have access to a fully functional CMS and the option to add free packages such as an SEO-assistant and social add-ons or commercial packages including newsletter services and event calendars.

If you are new to Composite C1 and want to install it: http://docs.composite.net/Getting-started

You can upgrade to version 4.2 Update 1 from earlier Composite C1 releases – see guide lines below.

What’s new in 4.2 Update 1?

This update contain a number of fixes and is a recommended update to 4.2.

What’s new in 4.2?

Most important of all the 4.2 release enable users to build much richer web experiences – this is possible thanks to a simplified interface for changing C1 Function settings and ‘pixel perfect’ previews of C1 Functions in the Visual Editor, making it very easy to locate elements you need to update.

The list of changes below is not exhaustive, but contains the highlights of this release.

  • C1 Functions embedded in the Visual Editor show a “perfect preview” of the function output.

The Visual Editor in Composite C1 now acurately represent C1 Function calls with a preview

  • Editing C1 Functions from the Visual Editor is a lot more user friendly

The Function Call Editor is now way more user friendly

  • New responsive starter site “Venus” .

Venus Starter Site

  • The Visual Editor canvas width is now set to match the width of the content placeholder in the actual rendered template. If you update the template or CSS the width will follow.

We set the width of the Visual Editor so it matches your web design

  • Content editing on iPad functional

Editing Content on iPad

  • Server Log (moved to System perspective) contains login auditing, present stack traces much better and more. If verbose logging is enabled the log will also contain auditing info about major actions (like page edits) and user access changes.
  • Google Chrome issues in the C1 Console fixed.
  • ASP.NET Razor 3.1.1 now default
  • New UI widget for selecting glyphicons and similar font based icons
  • New security permission type ‘Configure’ added – actions like adding a new website and managing meta data / page folders now require this (or admin) permission.

Known Issues

You may not get the visual previews for C1 Functions if you run in certain hosting environments. In those cases you will get a generic representation of the C1 Function like previously.

This is the case on Windows Azure Web Sites (WAWS) – this is due do blocks in the IP stack on this platform.

Upgrade guidelines

You can upgrade manually (copy files, modify xml in config files etc.) or you can automate the procedure using an Upgrade Package.

Manual Upgrade

The manual upgrade guidelines are posted “gratis” on CodePlex when available. They are intended for the tech savvy DIY developers and organizations.
If you are already on version 4.2 you can use the automated upgrade prodecure described below “Upgrading from earlier Composite C1 4.2 releases”.

Easy Upgrade

The Upgrade Package is a paid service that provide you with upgrade support and a simple and painless upgrade path – you can upgrade directly from the web interface with a few clicks. Beside from making continuous upgrades easy you help fund the development of Composite C1, which is a super awesome thing to do.

Upgrading from earlier Composite C1 4.2 releases

We have created an upgrade package that will upgrade you from version 4.2 to 4.2 Update 1. Anyone can install this upgrade using the following steps:

  1. Make a backup of your website.
  2. In the C1 Console, go to “Packages” on the System perspective
  3. Browse down “Composite.Updates” and click “Package Info” on the 4.2 Update 1 upgrade
  4. In the Package Info view, click install
  5. Complete the wizard
  6. Enjoy

After upgrading you should immediately see the new features – no configuration needed.

Best Recommendation Composite C1 4.2

ASPHostPortal.com

ASPHostPortal.com  is the leading provider of Windows hosting and affordable Composite C1  4.2 Hosting. ASPHostPortal proudly working to help grow the backbone of the Internet, the millions of individuals, families, micro-businesses, small business, and fledgling online businesses. ASPHostPortal has ability to support the latest Microsoft and ASP.NET technology, such as: WebMatrix, WebDeploy, Visual Studio 2015, .NET 5/ASP.NET 4.5.2, ASP.NET MVC 6.0/5.2, Silverlight 6 and Visual Studio Lightswitch, ASPHostPortal guarantees the highest quality product, top security, and unshakeable reliability, carefully chose high-quality servers, networking, and infrastructure equipment to ensure the utmost reliability.

UKWindowsHostASP.NET

UKWindowsHostASP.NET has over ten-year hosting experience and has developed thousands of loyal clients including individuals and large company owners. If you want excellent experience in Composite C1 4.2 hosting at the most affordable prices in the market, UKWindowsHostASP. NET is a good choice. We have been reviewed by dozens hosting reviews site and they compare us with over one hundred hosting providers. According to their reviews, we always awarded as High Quality Composite C1 4.2 Hosting that offer competitive prices : the Lite Class prices £1.00/mo while the Enterprise Class charges for only $14/mo.

DiscountService.biz

DiscountService.biz is The Best and Cheap Composite C1 4.2 Hosting. DiscountService.biz was established to cater to an under served market in the hosting industry web hosting for customers who want excellent service. DiscountService.biz guarantees the highest quality product, top security, and unshakeable reliability, carefully chose high-quality servers, networking, and infrastructure equipment to ensure the utmost reliability. DiscountService.biz has ability to support the latest Microsoft and ASP.NET technology, such as: WebMatrix, WebDeploy, Visual Studio 2015, .NET 5/ASP.NET 4.5.2, ASP.NET MVC 6.0/5.2, Silverlight 6 and Visual Studio Lightswitch. DiscountService.biz is devoted to offering the best Windows hosting solution for you

Cheap And Reliable :: How to Create ModalPopUp Control in ASP.NET AJAX

Today we will learn about  How to Create ModalPopUp Control in ASP.NET AJAX. Let me to tell you step by  step..

details

Requirements

  • First we need to create a ModalPopUp control.
  • Perform the Data Validation.
  • Savi the data to the database.
  • Show the saved data in a GridView.

Database Table Structure

create table tbl_ModalPopUp_Sample  
(  
   ID int identity primary key,  
   UserName varchar(50),  
   Mobile_No bigint  
) 

 Procedure 

  • Design the Form.
  • For this design I am using the UserControl of ASP.Net.
  • Drag a Modal Popup to the form.
  • Sets its Property.
CancelControlID="btnClose" 
TargetControlID="LinkButton1"
BackgroundCssClass="modalBackground"  
DropShadow="True" 
PopupControlID="ModalBox" (The ID of the Panel or DIV) 
    <asp:ModalPopupExtender ID="ModalPopupExtender1" runat="server"   
        CancelControlID="btnClose" PopupControlID="ModalBox"   
        TargetControlID="LinkButton1" BackgroundCssClass="modalBackground"   
        DropShadow="True">  
        </asp:ModalPopupExtender>  

 We must call the ID of the Panel or DIV at the ModalPopUp PopupControlID=” “ property that we want to show as the design of the ModalPopUp Control.

CSS Class For ModalPopUp

    .modalBackground  
     {         
         background-color: #336699;  
         filter: alpha(opacity=80);  
         opacity: 0.8;  
     }   
      
     .modalBackground:hover    
     {  
         background-color : #CC3300;  
     }  

After adding ModalPopUp

You will find this Page Directive at the page level after adding the ModalPopUp:

Layout of the design

Lay Out Of The Design

Complete Design

<%@ Control Language="C#" AutoEventWireup="true" CodeFile="Modal_Pooup_Control.ascx.cs" Inherits="Ajax_User_Controls_Modal_Pooup_Control" %>  
<%@ Register Assembly="AjaxControlToolkit" Namespace="AjaxControlToolkit" TagPrefix="asp" %>  
     <style type="text/css">  
         
        .Clear  
        {  
            clear:both;  
        }  
          
        .logButton  
        {  
          width: 100px;  
          height: 30px;  
          background-color: #FB5F67;  
          font-family: Arial, Helvetica, sans-serif; font-size: 13px; font-weight: bold; font-style: normal;   
            font-variant: normal; text-transform: capitalize; color: #FFFFFF;       
        }  
        a:hover {color:#FF00FF;}  
        a:link    {color:blue;}  
        a:visited {color:green;}  
        a:active  {color:yellow;}  
          
        input[type="submit"]:hover {  
    background:#0000FF;  
}  
  
        .LoginBox  
        {  
            margin: 10px;  
            height: 270px;  
            background-color: #FB5F67;  
        }  
        .Heading  
        {  
            margin: 10px;  
            height: 15px;  
            background-color: #FFFFFF;  
            font-family: Arial, Helvetica, sans-serif; font-size: 12px; font-weight: bold; font-style: normal;   
            font-variant: normal; text-transform: capitalize; color: #6C6B6B;   
            text-align: center;  
            padding: 4px;  
        }  
  
        .InnerLogin  
        {  
            margin: 10px;  
            margin-right: 5px;  
            width: 320px;  
            height: 250px;  
            float: left;  
            background-color: White;  
        }  
        .NewUserBox  
        {  
            margin: 10px;  
            margin-left: 5px;          
            width: 330px;  
            height: 250px;  
            float: left;  
            background-color: White;  
        }  
  
        .ClickButton  
        {  
          width: 100px;  
          height: 30px;  
          background-color: #339933;  
          font-family: Arial, Helvetica, sans-serif; font-size: 13px; font-weight: bold; font-style: normal;   
          font-variant: normal; text-transform: capitalize; color: #FFFFFF;       
        }  
                 
         .ContentInside  
         {  
             margin: 10px;  
         }  
          
     .TextBoxSize  
         {  
             width: 200px;  
         }  
  
     .SmallTextBox  
         {  
            width: 100px;    
         }  
           
         .DropDownSize  
         {  
           width: 255px;  
           height: 23px;    
         }  
     .ContentMiddle  
         {  
             margin: 0px auto;  
             height: auto;  
             width: 500px;  
         }  
          
         .LeftHeading  
         {  
             font-family: Arial, Helvetica, sans-serif;  
             font-size: 14px;  
             font-weight: bold;  
             font-style: normal;  
             font-variant: normal;  
             text-transform: capitalize;  
             color: #CC3300;  
             text-align: left;  
         }  
  
     .SubHeadingLeft  
         {  
             margin: 10px;  
             height: 15px;  
             padding: 4px;  
             background-color: #999999;  
             font-family: Arial, Helvetica, sans-serif;  
             font-size: 12px;  
             font-weight: bold;  
             font-style: normal;  
             font-variant: normal;  
             text-transform: capitalize;  
             color: #FFFFFF;  
             text-align: left;  
         }  
  
    .SmallButton  
        {  
          width: 70px;  
          height: 30px;  
          background-color: #666633;  
          font-family: Arial, Helvetica, sans-serif; font-size: 13px; font-weight: bold; font-style: normal;   
          font-variant: normal; text-transform: capitalize; color: #FFFFFF;       
        }  
    .modalBackground  
    {         
        background-color: #336699;  
        filter: alpha(opacity=80);  
        opacity: 0.8;  
    }         
  
      .modalBackground:hover    
      {  
          background-color : #CC3300;  
          }  
         .style1  
         {  
             width: 20px;  
         }  
         .style3  
         {  
             width: 4px;  
         }  
         .style4  
         {  
             width: 5px;  
             color: Red;  
         }  
          
          
         .style5  
         {  
             width: 525px;  
         }  
          
          
         .style6  
         {  
             height: 34px;  
         }  
         .style7  
         {  
             width: 525px;  
             height: 34px;  
         }  
         .style8  
         {  
             height: 23px;  
         }  
          
          
         .style9  
         {  
             width: 136px;  
         }  
         .style10  
         {  
             height: 34px;  
             width: 136px;  
         }  
         .style12  
         {  
             height: 34px;  
             width: 20px;  
         }  
         .style14  
         {  
             height: 34px;  
             width: 4px;  
         }  
         .style15  
         {  
             width: 120px;  
         }  
          
          
    </style>  
<div class="Heading">  
    ModalPouUp Control</div>  
<div class="ContentInside">  
    <asp:ScriptManagerProxy ID="ScriptManagerProxy1" runat="server">  
    </asp:ScriptManagerProxy>  
</div>  
<div class="ContentInside">  
    <asp:UpdatePanel ID="UpdatePanel3" runat="server" UpdateMode="Conditional">  
    <ContentTemplate>  
    <table style="width:100%;">  
        <tr>  
            <td class="style1">  
                 </td>  
            <td class="style9">  
                 </td>  
            <td class="style3">  
                 </td>  
            <td class="style5">  
                 </td>  
            <td>  
                 </td>  
        </tr>  
        <tr>  
            <td class="style12">  
                </td>  
            <td class="style10">  
                Insert New Data</td>  
            <td class="style14">  
                :</td>  
            <td class="style7">  
                <asp:LinkButton ID="LinkButton1" runat="server">Procede</asp:LinkButton>  
            </td>  
            <td class="style6">  
                </td>  
        </tr>  
        <tr>  
            <td class="style1">  
                 </td>  
            <td class="style9">  
                 </td>  
            <td class="style3">  
                 </td>  
            <td class="style5">  
                 </td>  
            <td>  
                 </td>  
        </tr>  
    </table>  
    <asp:ModalPopupExtender ID="ModalPopupExtender1" runat="server"   
        CancelControlID="btnClose" PopupControlID="ModalBox"   
        TargetControlID="LinkButton1" BackgroundCssClass="modalBackground"   
        DropShadow="True">  
        </asp:ModalPopupExtender>  
    </ContentTemplate>  
   </asp:UpdatePanel>  
</div>  
<div class="ContentInside" id="ModalBox" runat="server"    
      
    style="background-color: #0099CC; color: #FFFFFF; font-weight: bold; font-family: Cambria; font-style: normal; text-transform: capitalize">  
<asp:UpdatePanel ID="UpdatePanel1" runat="server">  
  <ContentTemplate>   
        <table style="width:100%;">  
            <tr>  
                <td class="style1">  
                     </td>  
                <td class="style15">  
                     </td>  
                <td class="style3">  
                     </td>  
                <td class="style4">  
                     </td>  
                <td>  
                     </td>  
                <td>  
                     </td>  
            </tr>  
            <tr>  
                <td class="style1">  
                     </td>  
                <td class="style15">  
                    User name</td>  
                <td class="style3">  
                    :</td>  
                <td class="style4">  
                    *</td>  
                <td>  
                    <asp:TextBox ID="txtUserName" runat="server" CssClass="TextBoxSize"></asp:TextBox>  
                </td>  
                <td>  
                     </td>  
            </tr>  
            <tr>  
                <td class="style1">  
                     </td>  
                <td class="style15">  
                     </td>  
                <td class="style3">  
                     </td>  
                <td class="style4">  
                     </td>  
                <td>  
                    <asp:RequiredFieldValidator ID="RequiredFieldValidator1" runat="server"   
                        ControlToValidate="txtUserName" ErrorMessage="* Enter UserName" ForeColor="Red"   
                        ValidationGroup="abc"></asp:RequiredFieldValidator>  
                </td>  
                <td>  
                     </td>  
            </tr>  
            <tr>  
                <td class="style1">  
                     </td>  
                <td class="style15">  
                    Mobile Number</td>  
                <td class="style3">  
                    :</td>  
                <td class="style4">  
                    *</td>  
                <td>  
                    <asp:TextBox ID="txtMobile" runat="server" CssClass="TextBoxSize"></asp:TextBox>  
                </td>  
                <td>  
                     </td>  
            </tr>  
            <tr>  
                <td class="style1">  
                     </td>  
                <td class="style15">  
                     </td>  
                <td class="style3">  
                     </td>  
                <td class="style4">  
                     </td>  
                <td>  
                    <asp:RequiredFieldValidator ID="RequiredFieldValidator2" runat="server"   
                        ControlToValidate="txtMobile" ErrorMessage="* Enter Mobile No" ForeColor="Red"   
                        ValidationGroup="abc"></asp:RequiredFieldValidator>  
                    <asp:RangeValidator ID="RangeValidator1" runat="server"   
                        ControlToValidate="txtMobile" ErrorMessage="* Minimum 10 Digit Mobile Number"   
                        ForeColor="Red" MaximumValue="9999999999" MinimumValue="1000000000"   
                        Type="Double" ValidationGroup="abc"></asp:RangeValidator>  
                </td>  
                <td>  
                     </td>  
            </tr>  
            <tr>  
                <td class="style1">  
                     </td>  
                <td class="style15">  
                     </td>  
                <td class="style3">  
                     </td>  
                <td class="style4">  
                     </td>  
                <td>  
                    <asp:Button ID="btnSave" runat="server" CssClass="ClickButton" Text="Save"   
                        onclick="btnSave_Click" ValidationGroup="abc" />  
                    <asp:Button ID="btnReset" runat="server" CssClass="ClickButton"   
                        onclick="btnReset_Click" Text="Reset" />  
                    <asp:Button ID="btnClose" runat="server" CssClass="ClickButton" Text="Close" />  
                </td>  
                <td>  
                     </td>  
            </tr>  
            <tr>  
                <td class="style1">  
                     </td>  
                <td class="style15">  
                     </td>  
                <td class="style3">  
                     </td>  
                <td class="style4">  
                     </td>  
                <td>  
                    <asp:Label ID="lblMessage1" runat="server" ForeColor="Red"></asp:Label>  
                </td>  
                <td>  
                     </td>  
            </tr>  
            <tr>  
                <td class="style1">  
                     </td>  
                <td class="style15">  
                     </td>  
                <td class="style3">  
                     </td>  
                <td class="style4">  
                     </td>  
                <td>  
                     </td>  
                <td>  
                     </td>  
            </tr>  
        </table>  
    </ContentTemplate>  
    </asp:UpdatePanel>    
</div>  
<div class="ContentInside">  
    <asp:UpdatePanel ID="UpdatePanel2" runat="server">  
    <ContentTemplate>  
    <table style="width:100%;">  
        <tr>  
            <td class="style8">  
            </td>  
            <td class="style8">  
                <asp:GridView ID="GridView1" runat="server" BackColor="White"   
                    BorderColor="#CC9966" BorderStyle="None" BorderWidth="1px" CellPadding="4"   
                    AllowPaging="True" onpageindexchanging="GridView1_PageIndexChanging"   
                    PageSize="5">  
                    <FooterStyle BackColor="#FFFFCC" ForeColor="#330099" />  
                    <HeaderStyle BackColor="#990000" Font-Bold="True" ForeColor="#FFFFCC" />  
                    <PagerStyle BackColor="#FFFFCC" ForeColor="#330099" HorizontalAlign="Center" />  
                    <RowStyle BackColor="White" ForeColor="#330099" />  
                    <SelectedRowStyle BackColor="#FFCC66" Font-Bold="True" ForeColor="#663399" />  
                    <SortedAscendingCellStyle BackColor="#FEFCEB" />  
                    <SortedAscendingHeaderStyle BackColor="#AF0101" />  
                    <SortedDescendingCellStyle BackColor="#F6F0C0" />  
                    <SortedDescendingHeaderStyle BackColor="#7E0000" />  
                </asp:GridView>  
            </td>  
            <td class="style8">  
            </td>  
        </tr>  
        <tr>  
            <td>  
                 </td>  
            <td>  
                <asp:Label ID="lblMessage2" runat="server" ForeColor="Red"></asp:Label>  
            </td>  
            <td>  
                 </td>  
        </tr>  
        </table>  
    </ContentTemplate>  
   </asp:UpdatePanel>  
</div> 

 I will use LINQ to do the database operations.

add table

Complete C# Code

    using System;  
    using System.Collections.Generic;  
    using System.Linq;  
    using System.Web;  
    using System.Web.UI;  
    using System.Web.UI.WebControls;  
    using System.Drawing;  
      
    public partial class Ajax_User_Controls_Modal_Pooup_Control : System.Web.UI.UserControl  
    {  
        protected void Page_Load(object sender, EventArgs e)  
        {  
            LoadGridData();  
        }  
      
        private void LoadGridData()  
        {  
            try  
            {  
                using (DataClassesDataContext DbContext = new DataClassesDataContext())  
                {  
                    var Data = DbContext.tbl_ModalPopUp_Samples;  
                    //  
                    GridView1.DataSource = Data;  
                    GridView1.DataBind();  
                }  
            }  
            catch (Exception Exc)  
            {  
                lblMessage2.Visible = true;  
                lblMessage2.ForeColor = Color.Red;  
                lblMessage2.Text = " Application Error :  " + Exc.Message;  
            }  
      
            finally  
            {  
                //  
            }  
        }  
        protected void btnSave_Click(object sender, EventArgs e)  
        {  
            DataSave();  
        }  
      
        private void DataSave()  
        {  
            try  
            {  
                using (DataClassesDataContext DbContext = new DataClassesDataContext())  
                {  
                    tbl_ModalPopUp_Sample tbl = new tbl_ModalPopUp_Sample();  
                    tbl.UserName = txtUserName.Text;  
                    tbl.Mobile_No = Convert.ToInt64(txtMobile.Text);  
                    //  
                    DbContext.tbl_ModalPopUp_Samples.InsertOnSubmit(tbl);  
                    DbContext.SubmitChanges();  
                }  
                //  
                lblMessage1.ForeColor = Color.Blue;  
                lblMessage1.Text = "Data Saverd Successfully.";  
                //  
                ResetAll();  
                LoadGridData();  
            }  
            catch (Exception Exc)  
            {  
                lblMessage1.Visible = true;  
                lblMessage1.ForeColor = Color.Red;  
                lblMessage1.Text = " Application Error :  " + Exc.Message;  
            }  
      
            finally  
            {  
                //  
            }  
        }  
        protected void btnReset_Click(object sender, EventArgs e)  
        {  
            ResetAll();  
            lblMessage1.Text = "";  
            lblMessage2.Text = "";  
        }  
      
        private void ResetAll()  
        {  
            txtUserName.Text = "";  
            txtMobile.Text = "";  
        }  
      
        protected void GridView1_PageIndexChanging(object sender, GridViewPageEventArgs e)  
        {  
            GridView1.PageIndex = e.NewPageIndex;  
            LoadGridData();  
        }  
    }  

 Run this application .. I hope this article helpful for you 🙂

Best Recommended ASP.NET 5 Hosting

ASPHostPortal.com

ASPHostPortal.com is Perfect, suitable hosting plan for a starter in ASP.NET 5 Hosting. ASPHostPortal  the leading provider of Windows hosting and affordable ASP.NET Hosting. ASPHostPortal proudly working to help grow the backbone of the Internet, the millions of individuals, families, micro-businesses, small business, and fledgling online businesses. ASPHostPortal has ability to support the latest Microsoft and ASP.NET technology, such as: WebMatrix, WebDeploy, Visual Studio 2015, .NET 5/ASP.NET 4.5.2, ASP.NET MVC 6.0/5.2, Silverlight 6 and Visual Studio Lightswitch, ASPHostPortal guarantees the highest quality product, top security, and unshakeable reliability, carefully chose high-quality servers, networking, and infrastructure equipment to ensure the utmost reliability.

HostForLIFE.eu

HostForLIFE.eu guarantees 99.9% uptime for their professional ASP.NET hosting and actually implements the guarantee in practice. HostForLIFE.eu is the service are excellent and the features of the web hosting plan are even greater than many hosting. HostForLIFE.eu offer IT professionals more advanced features and the latest technology. Relibility, Stability and Performance of  servers remain and TOP priority. Even basic service plans are equipped with standard service level agreements for 99.99% uptime. Advanced options raise the bar to 99.99%. HostForLIFE.eu revolutionized hosting with Plesk Control Panel, a Web-based interface that provides customers with 24×7 access to their server and site configuration tools.

DiscountService.biz

DiscountService.biz is The Best and Cheap ASP.NET Hosting. DiscountService.biz was established to cater to an under served market in the hosting industry web hosting for customers who want excellent service. DiscountService.biz guarantees the highest quality product, top security, and unshakeable reliability, carefully chose high-quality servers, networking, and infrastructure equipment to ensure the utmost reliability. DiscountService.biz has ability to support the latest Microsoft and ASP.NET technology, such as: WebMatrix, WebDeploy, Visual Studio 2015, .NET 5/ASP.NET 4.5.2, ASP.NET MVC 6.0/5.2, Silverlight 6 and Visual Studio Lightswitch. DiscountService.biz is devoted to offering the best Windows hosting solution for you.

Cheap and Reliable Hosting :: How to Create Widget using WordPress 4.1

IHostAzure.com | Cheap and Reliable WordPress 4.1 Hosting . Hello All today we will learn about how to create widget using wordpress, ok let me to show you now.

ahp banner wordpress-01

Widget is a small block that performs a specific function. You can add widgets in sidebars also known as widget areas on your web page. Widgets is easy to install and the list of widget available widgets and widget areas by going to the Appearance » Widgets

Default widgets including categories, tag cloud, navigation menu, calendar, search, recent posts etc. If you drag the recent posts widget in a widget area, then it will contain a list of recent posts in WordPress.

How to create widget

Step 1: To open function.php file and paste below code.

// Creating the widget    
class wpb_widget extends WP_Widget {   
   function __construct() {  
      parent::__construct(  
      // Base ID of your widget  
      'wpb_widget',  
      // Widget name will appear in UI  
      __('WPBeginner Widget', 'wpb_widget_domain'),  
      // Widget description  
      array( 'description' => __( 'Sample widget based on WPBeginner Tutorial', 'wpb_widget_domain' ), )   
      );  
   }  
   // Creating widget front-end  
   // This is where the action happens   
   public function widget( $args, $instance ) {  
      $title = apply_filters( 'widget_title', $instance['title'] );  
      // before and after widget arguments are defined by themes  
      echo $args['before_widget'];  
      if ( ! emptyempty( $title ) )   
      echo $args['before_title'] . $title . $args['after_title'];  
      // This is where you run the code and display the output  
      echo __( 'Hello, World!', 'wpb_widget_domain' );  
      echo $args['after_widget'];  
   }   
   // Widget Backend  
   public function form( $instance ) {  
      if ( isset( $instance[ 'title' ] ) ) {  
         $title = $instance[ 'title' ];  
         }else {   
            $title = __( 'New title', 'wpb_widget_domain' );  
         }  
         // Widget admin form  
      ?>  
      <p>  
      <label for="<?php echo $this->get_field_id( 'title' ); ?>"><?php _e( 'Title:' ); ?></label>  
      <input class="widefat" id="<?php echo $this->get_field_id( 'title' ); ?>" name="<?php echo $this->get_field_name( 'title' ); ?>" type="text" value="<?php echo esc_attr( $title ); ?>" />  
      </p>  
   <?php  
}  
// Updating widget replacing old instances with new  
public function update( $new_instance, $old_instance ) {  
      $instance = array();  
      $instance['title'] = ( ! emptyempty( $new_instance['title'] ) ) ? strip_tags( $new_instance['title'] ) : '';  
      return $instance;  
   }  
} // Class wpb_widget ends here  
// Register and load the widget  
function wpb_load_widget() {  
   register_widget( 'wpb_widget' );  
   }  
add_action( 'widgets_init', 'wpb_load_widget' );  

Step 2: Check widget in  widgets area.

So easy right?? I hope this tutorial help you 🙂

Best Recommendation  WordPress 4.1 Hosting

ASPHostPortal.com

ms_top

ASPHostPortal.com is Microsoft No #1 Recommended Windows and ASP.NET Spotlight Hosting Partner in United States. Microsoft presents this award to ASPHostPortal.com for the ability to support the latest Microsoft and ASP.NET technology, such as: WebMatrix, WebDeploy, Visual Studio 2015, .NET 5/ASP.NET 4.5.2, ASP.NET MVC 6.0/5.2, Silverlight 6 and Visual Studio Lightswitch.

WordPress 4.1 is now available in ASPHostPortal. New features in WordPress 4.1 help you focus on your writing, and the new default theme lets you show it off in style. WordPress 4.1 has been translated into 40 languages with other languages yet to come. The ASPHostPortal.com hosting platform is compatible with WordPress 4.1 application. WordPress is always the best, well-known blogging tools. Start your WordPress 4.1 Hosting with ASPHostPortal today!


Cheap and Reliable Hosting :: Best Recommended Plesk 12 Hosting

IHostAzure.com | Cheap and Reliable Plesk 12 Hosting. Now its difficult to find cheap and reliable hosting company, but don’t worry, here I recommend you choose cheap and reliable Plesk 12 hosting with ASPHostPortal.com to your site. Plesk 12 Hosting from ASPHostPortal.com is an effective, flexible and secure control panel for webmasters to meet the broadest range of customer requirements. It is compatible with both Windows and Linux platform but has a better reputation in the Windows web hosting field. Plesk 12 Hosting makes account management complete for server administrators. Plesk 12 Hosting is a complete multi-level hosting control panel, offering the server administrators a wide range of options to build and maintain the hosting business and also giving the end users full control over their websites. ASPHostPortal windows hosting is compatible with the Plesk 12 Hosting. Their offer Plesk 12 based hosting plan from just $5/month, start it now.

bannerplesk

What’s Plesk ?

Plesk is a server control panel from Parallels, available on the following products:

Plesk is a control panel available on the following products:

  • Linux Virtual Private Servers (VPS) running CentOS
  • Linux Dedicated Servers running Ubuntu
  • Linux Dedicated Servers running CentOS
  • Windows Virtual Private Servers (VPS)
  • Windows Dedicated Servers
  • Windows Managed and Fully Managed Servers
  • Windows Shared Hosting

It lets you easily manage many aspects of your account, including the files, applications, and email hosted on your account or server.

Parallels Plesk Panel allows a server administrator to set up new websites, reseller accounts, e-mail accounts, and DNS entries through a web-based interface. The administrator can create client and site templates, which predetermine resource-allocation parameters for the domains and/or clients.

Parallels Plesk Panel for Linux/Unix supports multiple POSIX platforms, including Debian, Fedora, FreeBSD, Red Hat Linux, SUSE and Ubuntu. Parallels Plesk Panel for Windows supports Windows Server 2003, Windows Server 2008 and Windows Server 2012 operating systems.

Parallels Plesk Panel installs custom versions of or manages versions of MySQL and PostgreSQL databases (Microsoft SQL Server and Microsoft SQL Server Desktop Engine under Windows), Apache Tomcat Java platform server, and ColdFusion server.

What’s New in Parallels Plesk 12

Protection from Outgoing Spam and Other Mail Improvements

Plesk 12.0 introduces numerous enhancements in mail:

  • Protection from outgoing spam.
  • Dovecot mail server support with server-based email filtering.
  • Protection from email interception.
  • Ability to switch off mail service for individual domains.

Administrators can protect server IP addresses from being put into spam blacklist due to outgoing spam. Plesk offers a solution for all three major modern threats: stolen SMTP/POP3 accounts, malicious mass mailing web scripts and hacked customers’ system accounts.

Each of these threats can be dealt with by limitation of outgoing email messages per hour. Limits can be defined for a mailbox (individual mailboxes), for a domain (all customer’s mailboxes and website on a domain), and for a system account (all mailboxes and websites from all customer’s domains). The limits can be set at the server level and for individual mailboxes or customer accounts. 

Now Plesk fully supports Dovecot mail server as a fast and efficient alternative to Courier for IMAP and POP3. With Dovecot sieve rules support, users can now set up server-based email filtering in mobile-friendly Horde and Roundcube webmail programs. Now it is also possible to set up out-of-office auto-replies directly in webmail. 

Protection from email interception. Malicious users can set up domain names that are identical to the domain names of popular online stores and other resources. In certain cases, this enables those users to receive email messages sent by your customers to the legitimate companies. To protect your customers from this type of scam, you can prohibit the setup of domain names that are already registered and belong to existing companies. There is a prefilled list containing a hundred popular domains. 

Now users can enable and disable mail service for individual domains and adjust other mail settings. Also, administrators and resellers can switch on and off the mail service on subscriptions by means of service plans.

Site and Server Security

Plesk 12.0 presents security improvements for server services and customer websites. This becomes possible with the help of two well known third-party security applications: Fail2Ban, intrusion detection and IP banning system, and ModSecurity, the Web Application Firewall (WAF).

Fail2ban support. Now administrators can protect their servers from different kinds of network attacks. Fail2ban, a popular intrusion prevention system, protects SSH, FTP, web, mail services, and Plesk itself. It detects suspicious activity and temporarily blocks the IP addresses of hosts that are trying to breach the system’s security. The default ban time is 10 minutes. 

ModSecurity support. Now administrators can use ModSecurity, an Apache-based web application firewall, to prevent malicious Internet users from damaging customers’ websites by exploiting vulnerabilities and design flaws in web applications. The heart of ModSecurity, security rule sets, are updated regularly and can be easily changed on-the-fly. Supported rule sets: Core ModSecurity (CRS), Atomic, and Comodo. 

The availability of Fail2Ban and ModSecurity depends on whether they are installed on the server and supported by your license key.

  • To check whether they are installed, go toServer Management > Tools & Settings > Updates & Upgrades. The ModSecurity component is listed in the “Web hosting features” group.
  • To check whether the license key supports both these components, go to Server Management > Tools & Settings > License Management, and see if there is the line “Security Core (ModSecurity and Fail2Ban) On”. If such a line is missing, your license key does not support them.

WordPress Toolkit

Plesk 12.0 introduces WordPress Toolkit, a powerful tool for managing APS- and non-APS-based WordPress installations. The toolkit enables server administrators, resellers, and customers to manage multiple WordPress installations, plugins, and themes from a single point of entry. Users can install, update, and remove WordPress installations, activate and remove plugins and themes.

WordPress Toolkit also addresses the WordPress security matters. Installation of WordPress via APS now immediately provides customers with secure WordPress instance out-of-the-box, applying recommended security improvements during the installation. You can scan selected WordPress installations to see how secure they are and apply selected security improvements. Since some of the security improvements may affect the functioning of WordPress, its plugins or themes, these improvements can be rolled back if something goes wrong.

Server administrators can control the availability of WordPress Toolkit for customers by means of service plans. The availability of security scan (including application and rollback of security enhancements) is managed by a separate option.

The availability of WordPress Toolkit depends on your license key. To check whether the license key supports it, go to Server Management > Tools & Settings > License Management, and see if there is the line “WordPress Toolkit On”. If such a line is missing, your license key does not support it.

Usability and Convenience

Plesk 12.0 makes account management complete for server administrators. Customer accounts can be moved from one reseller to another, and customer accounts can be converted to resellers and back. Custom comments for accounts and domains help to remember important nuances and simplify daily routines. Troubleshooting and assistance tasks become easier for administrators, who can work on behalf of their resellers, in addition to the previously available option to work on behalf of their customers.

Site management became easier for administrators in Power User Mode, resellers, and customers. Users can now select the “All subscription” option in the subscription or webspace selection menu, and manage all their sites from a single page. Also, the users of reseller accounts, who do not resell anything but only manage their own sites, can access a simplified site management interface.

Mobile-friendly interface: The tabbed user interface of hosting customers and Plesk administrators (when in Power User mode) automatically adjusts to the size of the screen on mobile devices.

Now users can restore individual reseller accounts, customer accounts, subscriptions, domains, DNS zones, mailboxes, mailing lists, databases, files and directories of a site, and SSL certificates. These are restored without any change in other content and without a need to hack into Plesk’s internal backup format. 

Multi-Language Support

Plesk is now available in 21 language, including English, German, Spanish, French, Italian, Japanese, Dutch, Russian, Chinese Traditional, Chinese Simplified, Polish, Portuguese, Brazilian Portuguese, Korean, Danish, Norwegian, Swedish, Finnish, Turkish, Greek, and Ukrainian.

Cheap And Reliable Hosting :: How To Install Persits ASPEncrypt

IHostAzure.com | Cheap and Reliable Persits ASPEncrypt Hosting. This article introduction about Persits ASPEncrypt and how to install it. let me to show you.

What is ASPEncrypt ?

ASPEncrypt is an ActiveX server component that brings security to your ASP or .NET application through encryption. With ASPEncrypt, you can encrypt text and files, send certificate-based secure mail, compute one-way hash values, generate and verify digital signatures, issue and manage X.509 digital certificatesAlthough this user manual is written primarily for ASP and ASP.NET developers, ASPEncrypt can be used with any development environment supporting COM, such as VB, Access, SQL Server, PHP, etc.

Feature

  • Easy, intuitive programming interface, most tasks can be implemented in just a few lines of script.
  • Encrypts text and files with all major symmetric ciphers: RC2, RC4, DES, Triple-DES, AES.
  • Encryption keys can be created randomly, generated from a password, or imported from an external source.
  • Ability to specify an initialization vector (IV), cipher mode and padding.
  • Computes one-way hash functions of text and files. All major hash functions are supported: MD4, MD5, SHA, SHA256.
  • Encrypts files as they are being uploaded, and decrypts files as they are being downloaded, when used in conjunction with AspUpload.
  • Sends certificate-based secure email in S/MIME format when used in conjunction with AspEmail. Email can be encrypted, digitally signed, or both.
  • Creates and manages digital certificates. Can be used to set up a local certification authority.
  • Manages certificate stores.
  • Supports the .cer, .spc and .pfx (.p12) certificate and store formats.
  • Creates and verifies digital signatures in PKCS#1 and PKCS#7 formats.
  • Encrypts (decrypts) data directly with a digital certificate’s public (private) key.
  • Supports PKCS#7-based signatures and envelopes.
  • Can be use as a client-side ActiveX control to perform cryptographic functions on a user machine without needing additional licenses.

System Requirements

  • Windows NT • 2000 • XP • 2003 • Vista • 2008 • 7 • 2012 • 8;
  • IIS with ASP or ASP.NET, or
  • Any development environment supporting COM.

Installation & Expiration Mechanism

The ASPEncrypt component consists of a single file, aspencrypt.dll (or, in case of the 64-bit version, aspencrypt64.dll). Being a COM object, this DLL needs to be registered on the server. The installer aspencrypt.exe (aspencrypt64.exe) performs the registration automatically. If manual installation is needed, the DLL must be registered with regsvr32.

To use ASPEncrypt under .NET, the interop assembly ASPENCRYPTLib.dll (shipped with the component) needs to be placed in the /Bin subfolder of the application. The main DLL aspencrypt.dll still needs to be properly registered.

ASPEncrypt works for 30 days without a registration key, and throws an expiration error afterwards. The purchased key needs to be placed in the system registry, as the default value, under

HKEY_LOCAL_MACHINE\Software\Persits Software\AspEncrypt\RegKey

If the 32-bit version of AspEncrypt is run on the 64-bit version of Windows, the key should be placed under

HKEY_LOCAL_MACHINE\Software\Wow6432Node\Persits Software\AspEncrypt\RegKey

Alternatively, the registration key can be specified in your code via the RegKey property of the top-level CryptoManager object, as follows:

Set CM = Server.CreateObject(“Persits.CryptoManager”)
CM.RegKey = “12345-12345-12345”

The current expiration date of the component can be retrieved via the Expires property, as follows:

Set CM = Server.CreateObject(“Persits.CryptoManager”)
Response.Write CM.Expires

If this property returns 9/9/9999 it means a permanent registration key is being used.

Quick Start

The following code sample encrypts and decrypts a text string using a password-based symmetric key.

At first, the top-level CryptoManager object is created, which serves as an object factory for all other AspEncrypt objects. Then a cryptographic context is opened via the method OpenContext. An instance of the CryptoContext object encapsulates the handle to a cryptographic provider, a Windows library that actually contains the cryptographic functionality we need (in this case, symmetric encryption.) The OpenContext method and cryptographic providers will be covered in detail in the next chapter.

Using CryptoContext, an instance of the CryptoKey object is then created via the method GenerateKeyFromPassword. CryptoKey encapsulates symmetric encryption and decryption functionality via the methods EncryptText and DecryptText, among others.

Once text is encrypted, it becomes an unreadable binary sequence. To store, export and import binary data, AspEncrypt offers a special object, CryptoBlob. An instance of CryptoBlob is the return value of the EncryptText method, and the input argument to the DecryptText method. An empty CryptoBlob object can be created via CryptoManager’s CreateBlob method.

VBScript
Set CM = Server.CreateObject("Persits.CryptoManager")
Set Context = CM.OpenContext( "", True )
' Create key from a password. Use default hash, cipher, and key size.
Set Key = Context.GenerateKeyFromPassword("mypassword")
Text = "my secret text"
Response.Write "Original text: " & Text
' Encrypt
Set Blob = Key.EncryptText( Text )
Response.Write "<P>Encrypted text in Base64 format: " & Blob.Base64
' Decrypt
Set Blob2 = CM.CreateBlob
Blob2.Base64 = Blob.Base64
ClearText = Key.DecryptText( Blob2 )
Response.Write "<P>Decrypted text: " & ClearText
C#
<%@ Import Namespace="System.Web" %>
<%@ Import Namespace="System.Reflection" %>
<%@ Import Namespace="ASPENCRYPTLib" %>
<script language="c#" runat="server">
void Page_Load(Object Source, EventArgs E)
{

                ICryptoManager objCM = new CryptoManager();
                ICryptoContext objContext = objCM.OpenContext( "",
                                true, Missing.Value );

                // Create key from a password. Use default hash, cipher, and key size
                ICryptoKey objKey = objContext.GenerateKeyFromPassword("mypassword",
                                Missing.Value, Missing.Value, Missing.Value);
                String strText = "my secret text";
                txtResult.Text = "Original text: " + strText;
                // Encrypt
                ICryptoBlob objBlob = objKey.EncryptText( strText );
                txtResult.Text += "<P>Encrypted text in Base64 format: " + objBlob.Base64;

                // Decrypt

                ICryptoBlob objBlob2 = objCM.CreateBlob();
                objBlob2.Base64 = objBlob.Base64;
                String strClearText = objKey.DecryptText( objBlob2 );
                txtResult.Text += "<P>Decrypted text: " + strClearText;

}
</script>
<asp:Label runat="server" id="txtResult"/>


Best Recommendation Persits ASPEncrypt Hosting

ASPHostPortal.com

ASPHostPortal.com is Cheap and Reliable  Persits ASPEncrypt Hosting. ASPHostPortal is the leading provider of Windows hosting and affordable  ASPEmail hosting. ASPHostPortal.com offers  Persits ASPEncrypt hosting! You can always start from their Beginner Hosting Plan (from $5.00 /month) to get this application installed on your website. ASPHostPortal.com is now providing free domain and double SQL server space for new clients to enjoy the company’s outstanding web hosting service. ASPHostPortal proudly working to help grow the backbone of the Internet, the millions of individuals, families, micro-businesses, small business, and fledgling online businesses. ASPHostPortal has ability to support the latest Microsoft and ASP.NET technology, such as: WebMatrix, WebDeploy, Visual Studio 2015, .NET 5/ASP.NET 4.5.2, ASP.NET MVC 6.0/5.2, Silverlight 6 and Visual Studio Lightswitch, ASPHostPortal guarantees the highest quality product, top security, and unshakeable reliability, carefully chose high-quality servers, networking, and infrastructure equipment to ensure the utmost reliability.

DiscountService.biz

DiscountService.biz is The Best and Cheap Persits ASPEncrypt hosting. DiscountService.biz was established to cater to an under served market in the hosting industry web hosting for customers who want excellent service. DiscountService.biz guarantees the highest quality product, top security, and unshakeable reliability, carefully chose high-quality servers, networking, and infrastructure equipment to ensure the utmost reliability. DiscountService.biz has ability to support the latest Microsoft and ASP.NET technology, such as: WebMatrix, WebDeploy, Visual Studio 2015, .NET 5/ASP.NET 4.5.2, ASP.NET MVC 6.0/5.2, Silverlight 6 and Visual Studio Lightswitch. DiscountService.biz is devoted to offering the best Persits ASPEmail hosting hosting solution for you.

UKWindowsHostASP.NET

UKWindowsHostASP.NET offers cheap classic ASP With Persits ASPEncrypt Hosting to all new and existing UK customers. You can try they services before buy it.There’s no obligation to buy — you can upgrade to a more robust account or cancel at any time. UKWindowsHostASP.NET guarantees 99.9% uptime for their professional ASPEmail hosting and actually implements the guarantee in practice. UKWindowsHostASP.NET is the service are excellent and the features of the web hosting plan are even greater than many hosting. UKWindowsHostASP.NET offer IT professionals more advanced features and the latest technology. Relibility, Stability and Performance of  servers remain and TOP priority.