Cheap And Reliable Hosting :: How To Using Persits ASPJpeg

IHostAzure | Cheap and Reliable Persits ASPJpeg Hosting. Today I will explains about how to using ASPJpeg, First I will tell you about what is ASPJpeg, do you know ASPJpeg?? Let me to tell you..

ASPJpeg is an advanced image management component to be used in a Microsoft IIS environment.  ASPJpeg enables your ASP/ASP.NET application to dynamically create high-quality thumbnails of images in just a few lines of code. An original image may be in any of the following formats : JPEG, GIF, BMP, TIFF or PNG.This component can be used in tandem with ASPUpload, the leading file upload component from Persits Software, Inc., to create thumbnails of images as they are being uploaded to the Web server.

ASPJpeg also a server component that will help your ASP or ASP.NET applications with all their image-management needs. With ASPJpeg you can create high-quality thumbnails, logo-stamp photographs, extract metadata information from images, crop, enhance, rotate, convert, and much more. For the complete list of features.

Feature ASPJpeg

  • Supports JPEG, GIF, BMP, TIFF and PNG formats as input.
  • Source images can be opened from disk, memory, or a recordset.
  • Resized images can be saved to disk, memory or an HTTP stream.
  • Supports three resizing algorithms: nearest-neighbor, bilinear, and bicubic.
  • Drawing and typing on top of an image. Support for TrueType and Type 1 fonts.
  • Automatic word wrapping, text alignment to the left, right, center and justified, rotation.
  • Picture-in-picture support.
  • Cropping, flipping, rotation, sharpening, grayscale conversion.
  • Compression rate of output images can be adjusted for optimal quality/file size ratio.
  • EXIF and IPTC metadata extraction from JPEG images.
  • Metadata preservation during resizing.
  • IPTC metadata adding and editing.
  • CMYK-to-RGB conversion.
  • Sepia filter.
  • Read/write access to individual pixels of an image.
  • PNG alpha channel support.
  • PNG output, alpha channel preservation.
  • GIF transparency support.
  • Brightness, contrast and saturation adjustment.
  • GIF output, transparency and animation preservation.
  • JPEG-to-GIF conversion.
  • Antialiased drawing routines.
  • Perspective projection.
  • Gaussian blur, edge detection, threshold, other filters.
  • Chroma key effect.

Using Persits ASPJpeg

Persits ASPJpeg is a server-side component that allows you to modify image data in your ASP scripts. LiquidSix offers you the ability to use our registered version of ASPJpeg.

How do you use Persits ASPJpeg?

The following is an example of using the ASPJpeg component to resize and rotate an image:

<%
        'Create an instance of our ASPJpeg object.
        Set jpegObj = Server.CreateObject("Persits.Jpeg")

        'Open an image from the same directory.
        jpegObj.Open Server.MapPath(".") & "\myimage.jpg"

        'Resize the image.
        jpegObj.Width = 100
        jpegObj.Height = 100

        'Rotate our image left.
        jpegObj.RotateL

        'Send our new image to the client.
        jpegObj.SendBinary
    %>

Why would I use Persits ASPJpeg?

ASPJpeg allows you to resize images dynamically, whilst keeping the original intact, many coders will use such a component to display thumbnail images, using something similar to the following:

    <img src="<thumbnail_page.asp>" />
    ...where <thumbnail_page.asp>

The page which contains a script like above, passing any parameters you need.

Best Recommended Persits ASPJpeg Hosting

ASPHostPortal.com

badge5

ASPHostPortal.com is Cheap and Reliable Persits ASPJpeg Hosting. ASPHostPortal is the leading provider of Windows hosting and affordable  ASPGrid hosting. ASPHostPortal.com offers  Persits ASPGrid hosting! You can always start from their Beginner Hosting Plan (from $5.00 /month) to get this application installed on your website. ASPHostPortal.com is now providing free domain and double SQL server space for new clients to enjoy the company’s outstanding web hosting service. Click here for more information


Cheap And Reliable Hosting :: How to Setup SharePoint 2013 on Windows Azure Part 1

How To : Setup SharePoint 2013 Virtual machine on Windows Azure

IHostAzure.com| Cheap And Reliable Hosting. In this article I will explains step by step  How to Setup SharePoint 2013 on Windows Azure.

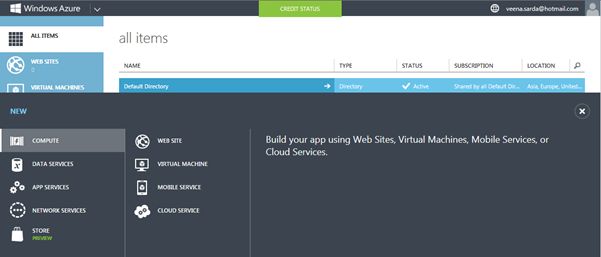
I was very excited with my MSDN subscription on Windows Azure and wanted to quickly set up SharePoint Server 2013 on the Windows Azure infrastructure. I started by logging and  entered my credentials and started with the screen as shown below.

SharePoint-1.jpg

Wrong way of provisioning SharePoint Server 2013 on Windows Azure

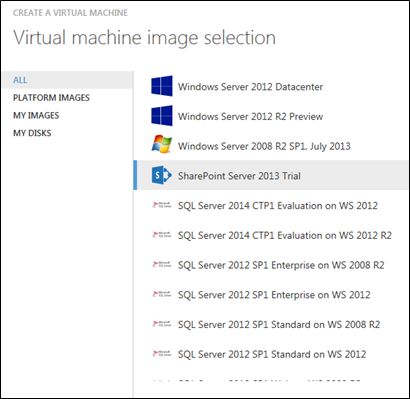
I see a SharePoint Server 2013 Trial image virtual machine in the Gallery and started directly provisioning the SharePoint Server thinking that a single standalone SharePoint Server 2013 will be provisioned.

SharePoint-2.jpg

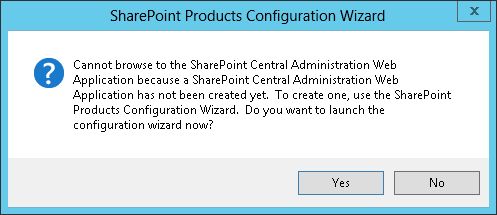
But after the VM was provisioned and I attempted to launch the SharePoint Administrator as done on the premise of SharePoint Server 2013 installation, I soon realised that this template (VM image) is not meant for a single standalone SharePoint Server 2013 installation. I get the following message:


SharePoint-3.jpg


Correct way of provisioning SharePoint Server 2013 on Windows Azure

At the minimum, there are 4 steps and multiple sub-steps that need to be followed to properly provision SharePoint Server 2013 on Windows Azure. So the 3 steps are as follows:

  • Create and Configure Network components
  • Install and Configure Domain Controller
  • Install and Configure SQL Server
  • Install and Configure SharePoint Server 2013

In this article we will see the initial step details and in subsequent articles we will see the remaining steps.

Create and configure Network components

So the first step is to create and configure network components. At the minimum we will need the following network components:

  • One Virtual Private Network
  • One DNS Server
  • Three Subnets
  • One Windows Azure Storage Account

Create VPN

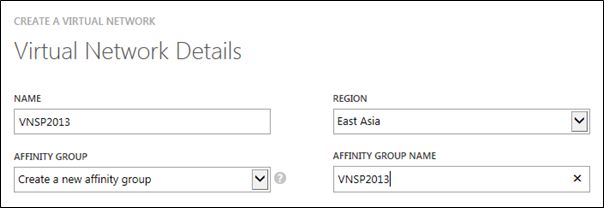
Click on the Network Services in the Windows Azure Manage portal and click on “New”. Enter the details such as Name and Region as shown below.


SharePoint-4.jpg

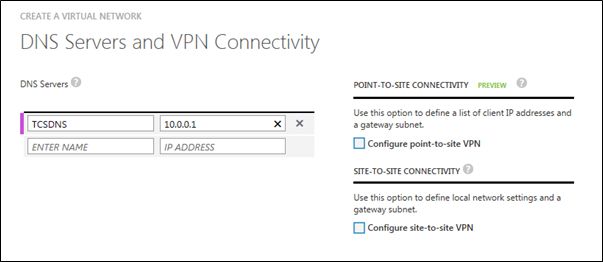
Create a DNS Server as shown below. Choose the IP as “10.0.0.4” since this is the static IP given to the DNS Server. Note: I realised this when I got an error to connect other servers to the domain.

SharePoint-5.jpg

Create SubNets

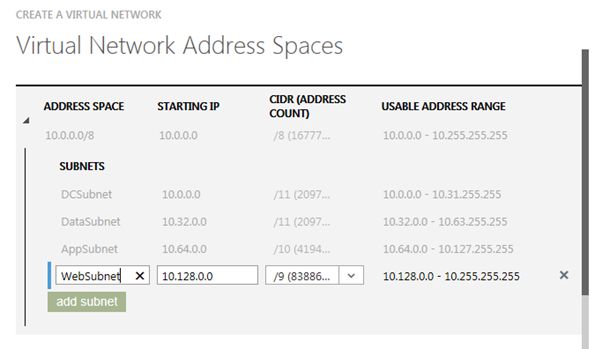
I have created 4 subnets below but a minimum of 3 is required for a small farm where AppSubnet and WebSubnet can be clubbed together. As the name suggests, we are using these for the Domain Controller, SQL Database, Application Server and Web Server roles.


SharePoint-6.jpg


Once all this is done, click on the “OK” tab and wait for a few minutes; your VPN will be created as shown below.


SharePoint-7.jpg

Create a storage account

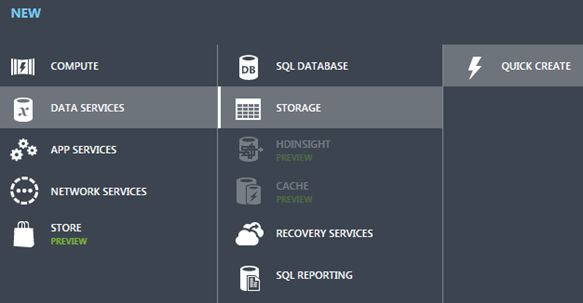
After the network is ready, as shown below create a storage account. Give it a name and follow the wizard. Your storage account will be created.

SharePoint-8.jpg


In the next article we will see how to create and configure a domain controller.

Best Recommended SharePoint 2013 Hosting

ASPHostPortal.com

ASPHostPortal.com is Perfect, suitable hosting plan for a starter in SharePoint. ASPHostPortal  the leading provider of Windows hosting and affordable SharePoint Hosting. ASPHostPortal proudly working to help grow the backbone of the Internet, the millions of individuals, families, micro-businesses, small business, and fledgling online businesses. ASPHostPortal has ability to support the latest Microsoft and ASP.NET technology, such as: WebMatrix, WebDeploy, Visual Studio 2015, .NET 5/ASP.NET 4.5.2, ASP.NET MVC 6.0/5.2, Silverlight 6 and Visual Studio Lightswitch, ASPHostPortal guarantees the highest quality product, top security, and unshakeable reliability, carefully chose high-quality servers, networking, and infrastructure equipment to ensure the utmost reliability.

HostForLIFE.eu

HostForLIFE.eu guarantees 99.9% uptime for their professional SharePoint hosting and actually implements the guarantee in practice. HostForLIFE.eu is the service are excellent and the features of the web hosting plan are even greater than many hosting. HostForLIFE.eu offer IT professionals more advanced features and the latest technology. Relibility, Stability and Performance of  servers remain and TOP priority. Even basic service plans are equipped with standard service level agreements for 99.99% uptime. Advanced options raise the bar to 99.99%. HostForLIFE.eu revolutionized hosting with Plesk Control Panel, a Web-based interface that provides customers with 24×7 access to their server and site configuration tools.

DiscountService.biz

DiscountService.biz is The Best and Cheap SharePoint Hosting. DiscountService.biz was established to cater to an under served market in the hosting industry web hosting for customers who want excellent service. DiscountService.biz guarantees the highest quality product, top security, and unshakeable reliability, carefully chose high-quality servers, networking, and infrastructure equipment to ensure the utmost reliability. DiscountService.biz has ability to support the latest Microsoft and ASP.NET technology, such as: WebMatrix, WebDeploy, Visual Studio 2015, .NET 5/ASP.NET 4.5.2, ASP.NET MVC 6.0/5.2, Silverlight 6 and Visual Studio Lightswitch. DiscountService.biz is devoted to offering the best Windows hosting solution for you.


Cheap And Reliable Hosting :: How to Loading Sequence of Master Page, Contents Page and User Control in ASP.NET 5

IHostAzure.com| Cheap and Reliable Hosting. In this article I will show the loading process sequence of a Master Page that contains a Contents Page and that Contents Page has a User Control in ASP.NET 5

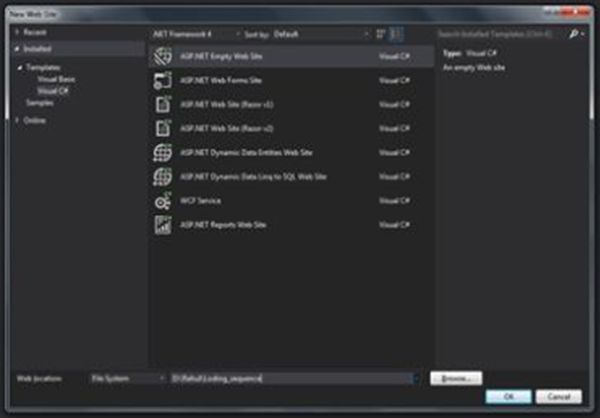
Step 1:

  • Create a website named “Loading_sequence”.

   empty website

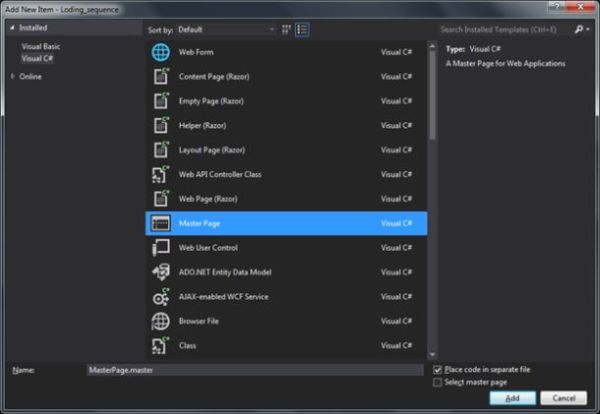
Step 2:

  • Add a Master Page named “MasterPage.master” within it by right-clicking on the website in “Solution Explorer” then choose “Add” -> “Add New Item”. master page
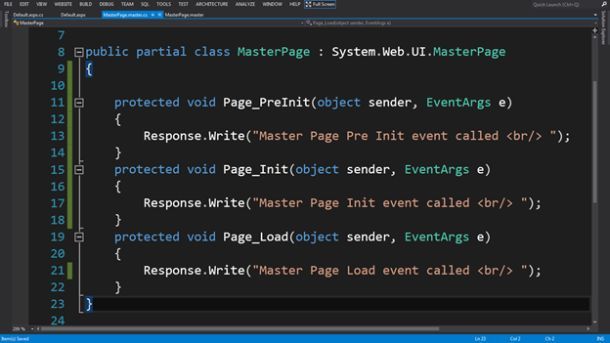
  • Create some events in the “.cs” file of the Master Page and add a “response.write()” method with unique text for monitoring the process of execution.
        protected void Page_PreInit(object sender, EventArgs e)  
        {  
           Response.Write("Master Page Pre Init event called <br/> ");  
        }  
        protected void Page_Init(object sender, EventArgs e)  
        {  
           Response.Write("Master Page Init event called <br/> ");  
        }  
        protected void Page_Load(object sender, EventArgs e)  
        {  
           Response.Write("Master Page Load event called <br/> ");  
        }  

    cs code

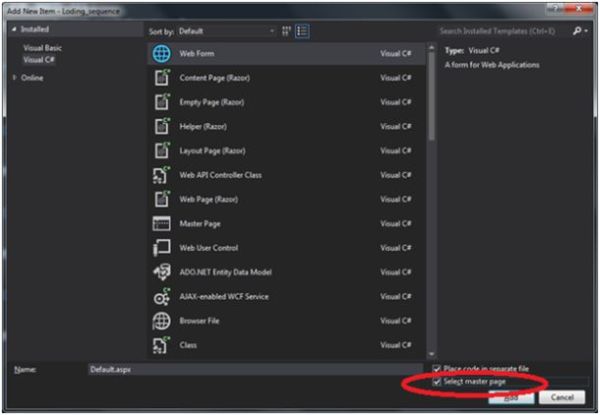
Step 3:

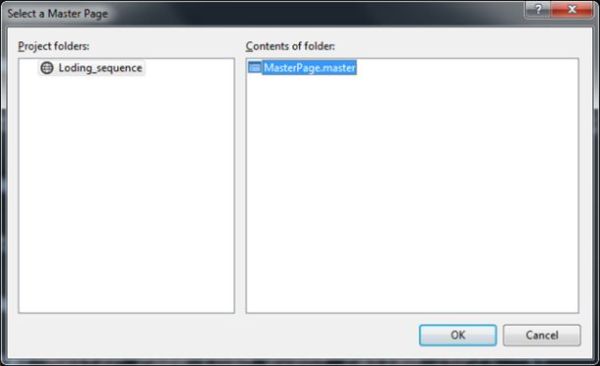
  • Add a Contents Page named “Default.aspx” within it by the right-clicking on the website in Solution Explorer then choose “Add” -> “Add New Item” and check the “Select master page” checkbox to attach the Master Page. web form
  • Select the Master Page name that you want to attach. select master page
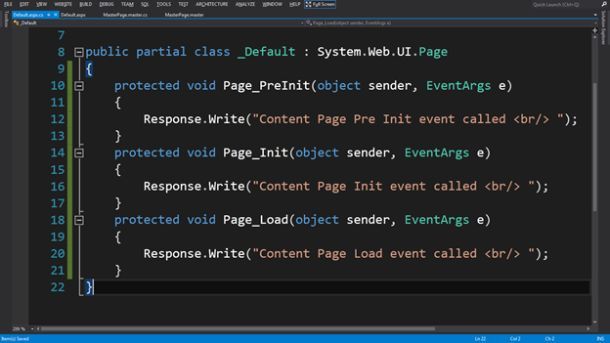
  • Create some events in the “.cs” file of the Contents Page and add a “response.write()” method with unique text by which we can monitor execution as written in the Master Page.


    protected void Page_PreInit(object sender, EventArgs e)  
    {  
       Response.Write("Content Page Pre Init event called <br/> ");  
    }  
    protected void Page_Init(object sender, EventArgs e)  
    {  
       Response.Write("Content Page Init event called <br/> ");  
    }  
    protected void Page_Load(object sender, EventArgs e)  
    {  
       Response.Write("Content Page Load event called <br/> ");  
    }

    response page

Step 4:

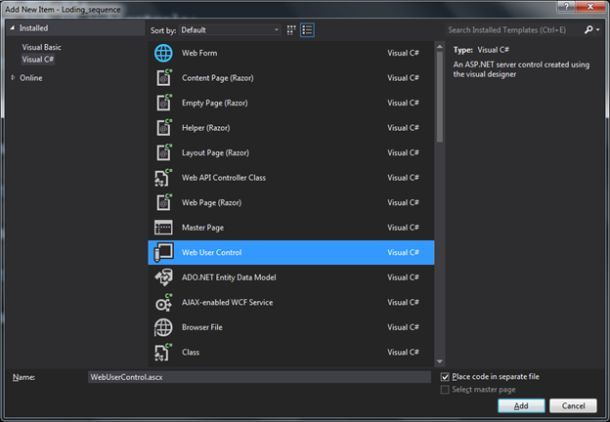
  • Add a Web User Control named “WebUserControl.aspx” within it by right-clicking on the website in Solution Explorer then choose “Add” -> “Add New Item”.web user control
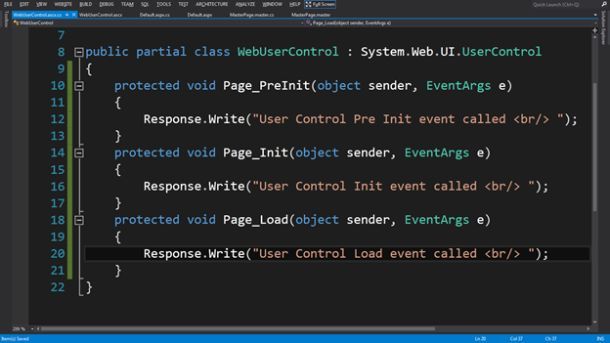
  • Create some events in the “.cs” file of the Web User Control and add a “response.write()” method with unique text for monitoring the execution as written in the Master Page and the Contents Page.


        protected void Page_PreInit(object sender, EventArgs e)  
        {  
           Response.Write("User Control Pre Init event called <br/> ");  
        }  
        protected void Page_Init(object sender, EventArgs e)  
        {  
           Response.Write("User Control Init event called <br/> ");  
        }  
        protected void Page_Load(object sender, EventArgs e)  
        {  
           Response.Write("User Control Load event called <br/> ");  
        }  

    User Control Load event

Step 5:

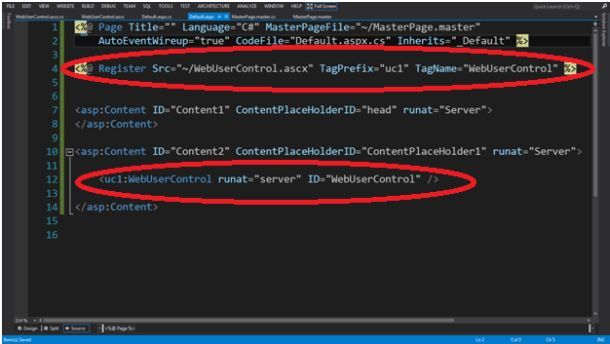
  • Add the Web User Control to the Contents Page then “Register Tag” and write the code to access the control by the “TagPrefix” and “TagName”.

   TagPrefix

Step 6:

  • Run the website to see the output.

  output

I hope this article helpful for you.

No #1 Recommended ASP.NET 5 Hosting

ASPHostPortal.com

ASPHostPortal.com  is the leading provider of Windows hosting and affordable ASP.NET Hosting. ASPHostPortal proudly working to help grow the backbone of the Internet, the millions of individuals, families, micro-businesses, small business, and fledgling online businesses. ASPHostPortal has ability to support the latest Microsoft and ASP.NET technology, such as: WebMatrix, WebDeploy, Visual Studio 2015, .NET 5/ASP.NET 4.5.2, ASP.NET MVC 6.0/5.2, Silverlight 6 and Visual Studio Lightswitch, ASPHostPortal guarantees the highest quality product, top security, and unshakeable reliability, carefully chose high-quality servers, networking, and infrastructure equipment to ensure the utmost reliability.

HostForLIFE.eu

HostForLIFE.eu guarantees 99.9% uptime for their professional ASP.NET hosting and actually implements the guarantee in practice. HostForLIFE.eu is the service are excellent and the features of the web hosting plan are even greater than many hosting. HostForLIFE.eu offer IT professionals more advanced features and the latest technology. Relibility, Stability and Performance of  servers remain and TOP priority. Even basic service plans are equipped with standard service level agreements for 99.99% uptime. Advanced options raise the bar to 99.99%. HostForLIFE.eu revolutionized hosting with Plesk Control Panel, a Web-based interface that provides customers with 24×7 access to their server and site configuration tools.

DiscountService.biz

DiscountService.biz is The Best and Cheap ASP.NET Hosting. DiscountService.biz was established to cater to an under served market in the hosting industry web hosting for customers who want excellent service. DiscountService.biz guarantees the highest quality product, top security, and unshakeable reliability, carefully chose high-quality servers, networking, and infrastructure equipment to ensure the utmost reliability. DiscountService.biz has ability to support the latest Microsoft and ASP.NET technology, such as: WebMatrix, WebDeploy, Visual Studio 2015, .NET 5/ASP.NET 4.5.2, ASP.NET MVC 6.0/5.2, Silverlight 6 and Visual Studio Lightswitch. DiscountService.biz is devoted to offering the best Windows hosting solution for you.

Cheap And Reliable Hosting :: How To Convert Date From Solar to Lunar (Hijri) Using VB.NET

Today I will explain about how to convert date from solar to lunar (Hijri) Using VB.NET The Lunar (Hijri) calendar is very important for Muslims as is the Solar calendar is important because the Lunar calendar was related to some elements of worship, so I looked at many sites on the internet to understand how to calculate the age of the moon in any given day, I found many sites offering various ways and I took what I found to provide results closer to the truth.

I’ve noticed that most sites agree on the expense of the date but don’t agree on how to calculate the age of the moon and found the difference between these sites to be up to one day and when the moon’s age is 30 days, the result is zero in some sites.
In this program I calculate the approximate age of the moon in days and did not give attention to the parts of the day of the hours and minutes.

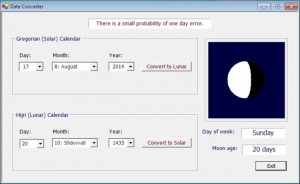
For the program to be more useful, I added a PictureBox control to display the lighted part of the moon and darkness part of the moon commensurate with the age of the moon.
There is a small probability of a one-day error for any calculation to convert a date.

Date Converter

Note: You can read Months by its name or by its number.

Code

Best Calculation to Get Number Approximation

Private Function getInt(ByRef fNumber As Double) As Double  
    If fNumber < -0.0000001 Then  
        getInt = Math.Ceiling(fNumber - 0.0000001)  
    Else  
        getInt = Math.Floor(fNumber + 0.0000001)  
    End If  
End Function

 Convert Solar Date to Lunar (Hijri) Date 

Private Sub SolarToLunar()  
    ' convert Solar year from 622 to 2500  
    Dim jd As Double  
    Dim j, L, n As Double  
    Dim d, m, y As Integer  
    Dim theDay As Integer  
    ' Solar day  
    d = Val(SolarDay.Text)  
    'get the number of Solar month  
    m = SolarMonth.SelectedIndex + 1  
    ' Solar year  
    y = Val(SolarYear.Text)  
    If (y > 1582) Or ((y = 1582) And (m > 10)) Or ((y = 1582) And (m = 10) And (d > 14)) Then  
            jd = getInt((1461 * (y + 4800 + getInt((m - 14) / 12))) / 4) + getInt((367 * (m - 2 - 12 * (getInt((m - 14) / 12)))) / 12) - getInt((3 * (getInt((y + 4900 + getInt((m - 14) / 12)) / 100))) / 4) + d - 32075  
        Else  
            jd = 367 * y - getInt((7 * (y + 5001 + getInt((m - 9) / 7))) / 4) + getInt((275 * m) / 9) + d + 1729777  
        End If  
        ' Solar year >= 622  
        If jd < 1948440 Then  
            DateMinError()  
            Exit Sub  
        End If  
        ' Solar year <= 2500  
        If jd > 2621734 Then  
            DateMaxError()  
            Exit Sub  
        End If  
        'day of the week  
        theDay = jd Mod 7  
        lblDay.Text = WeekDays(theDay)  
        L = jd - 1948440 + 10632  
        n = getInt((L - 1) / 10631)  
        L = L - 10631 * n + 354  
        j = (getInt((10985 - L) / 5316)) * (getInt((50 * L) / 17719)) + (getInt(L / 5670)) * (getInt((43 * L) / 15238))  
        L = L - (getInt((30 - j) / 15)) * (getInt((17719 * j) / 50)) - (getInt(j / 16)) * (getInt((15238 * j) / 43)) + 29  
        m = Int(getInt((24 * L) / 709))  
        d = Int(L - getInt((709 * m) / 24))  
        y = Int(30 * n + j - 30)  
        ' display Lunar date  
        LunarDay.Text = Str(d)  
        LunarMonth.Text = LunarMonths(m - 1)  
        LunarYear.Text = Str(y)  
        ShowMoonPhase()  
    If d = 1 Then  
        lblAge.Text = Str(d) & " day"  
    Else  
        lblAge.Text = Str(d) & " days"  
    End If  
End Sub  

 Convert Lunar (Hijri) Date to Solar Date

Private Sub LunarToSolar()  
    ' convert Lunar year from 1 to 1900  
    Dim jd As Double  
    Dim i, j, k, L, n As Double  
    Dim d, m, y As Integer  
    Dim theDay As Integer  
    ' Lunar day  
    d = Val(LunarDay.Text)  
    If d = 1 Then  
        lblAge.Text = Str(d) & " day"  
    Else  
        lblAge.Text = Str(d) & " days"  
    End If  
    'get the number of Lunar month  
    m = LunarMonth.SelectedIndex + 1  
    ' Lunar year  
    y = Val(LunarYear.Text)  
    jd = getInt((11 * y + 3) / 30) + 354 * y + 30 * m - getInt((m - 1) / 2) + d + 1948440 - 385  
    'day of the week  
    theDay = jd Mod 7  
    lblDay.Text = WeekDays(theDay)  
    If jd > 2299160 Then  
        L = jd + 68569  
        n = getInt((4 * L) / 146097)  
        L = L - getInt((146097 * n + 3) / 4)  
        i = getInt((4000 * (L + 1)) / 1461001)  
        L = L - getInt((1461 * i) / 4) + 31  
        j = getInt((80 * L) / 2447)  
        d = Int(L - getInt((2447 * j) / 80))  
        L = getInt(j / 11)  
        m = Int(j + 2 - 12 * L)  
        y = Int(100 * (n - 49) + i + L)  
    Else  
        j = jd + 1402  
        k = getInt((j - 1) / 1461)  
        L = j - 1461 * k  
        n = getInt((L - 1) / 365) - getInt(L / 1461)  
        i = L - 365 * n + 30  
        j = getInt((80 * i) / 2447)  
        d = Int(i - getInt((2447 * j) / 80))  
    i = getInt(j / 11)  
        m = Int(j + 2 - 12 * i)  
        y = Int(4 * k + n + i - 4716)  
    End If  
    ' display Solar date  
    SolarDay.Text = Str(d)  
    SolarMonth.Text = SolarMonths(m - 1)  
    SolarYear.Text = Str(y)  
    ShowMoonPhase()  
End Sub  

 Draw the Moon at Selected Date

Private Sub ShowMoonPhase()  
    Dim ag As Integer = Val(LunarDay.Text)  
    Dim Phase As Double = ag / 29.530588853  
    Dim Xpos, Ypos, Rpos As Integer  
    Dim Xpos1, Xpos2 As Integer  
    Me.ClearDraw() 'clear PicMoon PictureBox  
    ' Width of 'ImageToDraw' Object = Width of 'PicMoon' control  
    Dim PageWidth As Integer = Me.MoonShape.Width  
    ' Height of 'ImageToDraw' Object = Height of 'PicMoon' control  
    Dim PageHeight As Integer = Me.MoonShape.Height  
    ' Initiate 'ImageToDraw' Object with size = size of control 'PicMoon' control  
    Dim ImageToDraw As Bitmap = New Bitmap(PageWidth, PageHeight)  
    'Create graphics object for alteration.  
    Dim newGraphics As Graphics = Graphics.FromImage(ImageToDraw)  
    Dim PenW As Pen = New Pen(Color.White) ' For lighted part of the moon  
    Dim PenB As Pen = New Pen(Color.Black) ' For darkness part of the moon  
    For Ypos = 0 To 45  
        Xpos = Int(Math.Sqrt(45 * 45 - Ypos * Ypos))  
        ' Draw darkness part of the moon  
        Dim pB1 As Point = New Point(90 - Xpos, Ypos + 90)  
        Dim pB2 As Point = New Point(Xpos + 90, Ypos + 90)  
        Dim pB3 As Point = New Point(90 - Xpos, 90 - Ypos)  
        Dim pB4 As Point = New Point(Xpos + 90, 90 - Ypos)  
        newGraphics.DrawLine(PenW, pB1, pB2)  
        newGraphics.DrawLine(PenW, pB3, pB4)  
        ' Determine the edges of the lighted part of the moon  
        Rpos = 2 * Xpos  
        If (Phase < 0.5) Then  
            Xpos1 = -Xpos  
            Xpos2 = Int(Rpos - 2 * Phase * Rpos - Xpos)  
        Else  
            Xpos1 = Xpos  
            Xpos2 = Int(Xpos - 2 * Phase * Rpos + Rpos)  
        End If  
        ' Draw the lighted part of the moon  
        Dim pW1 As Point = New Point(Xpos1 + 90, 90 - Ypos)  
        Dim pW2 As Point = New Point(Xpos2 + 90, 90 - Ypos)  
        Dim pW3 As Point = New Point(Xpos1 + 90, Ypos + 90)  
        Dim pW4 As Point = New Point(Xpos2 + 90, Ypos + 90)  
        newGraphics.DrawLine(PenB, pW1, pW2)  
        newGraphics.DrawLine(PenB, pW3, pW4)  
    Next  
    ' Display the bitmap in the picture box.  
    Me.MoonShape.Image = ImageToDraw  
    ' Release graphics object  
    PenW.Dispose()  
    PenB.Dispose()  
    newGraphics.Dispose()  
    ImageToDraw = Nothing  
End Sub  


Cheap And Reliablle Hosting :: How To Merging Multiple DataTables Into Single DataTable Using ASP.Net C#

Data comes from multiple resources. Maybe sometimes it’s a similar data type but sometimes the information is different. Consider a bus reservation system with a different vendor from which similar bus seats are reserved and those are various sources. If the bus owner wants to see a single result set then we need to merge the data into a single set. Here i just giving a sample scenario, it also may be used for a different scenario.

Step-by-step how to merge multiple tables into a single table.

Step 1

Create an ASP.Net web application as in the following:
  1. “Start” – “All Programs” – “Microsoft Visual Studio”.
  2. “File” – “New Project” – “C#” – “Empty Project” (to avoid adding a master page).
  3. Provide the project a name such as “MergeMultipleDataTable” or another as you wish and specify the location.
  4. Then right-click on Solution Explorer and select “Add New Item” then select the Default.aspx page.
  5. Drag and drop three Grid Views to bind the records after joining the two tables.
Now the Default.aspx source code will be as follows:
    <%@ Page Language="C#" AutoEventWireup="true" CodeBehind="Defafult.aspx.cs" Inherits="MergeMultipleDataTable.Defafult" %>  
      
    <!DOCTYPE html PUBLIC "-//W3C//DTD XHTML 1.0 Transitional//EN" "http://www.w3.org/TR/xhtml1/DTD/xhtml1-transitional.dtd">  
      
    <html xmlns="http://www.w3.org/1999/xhtml">  
    <head runat="server">  
        <title></title>  
    </head>  
    <body style="background-color: Blue">  
        <h4 style="color: White">  
            Article by Vithal Wadje</h4>  
        <form id="form1" runat="server">  
        <div>  
            <h4 style="color: White">  
               DataTable First Records Before Merging  
            </h4>  
            <asp:GridView ID="GridView1" runat="server" CellPadding="4" ForeColor="#333333" GridLines="None">  
                <AlternatingRowStyle BackColor="White" />  
                <EditRowStyle BackColor="#7C6F57" />  
                <FooterStyle BackColor="#1C5E55" Font-Bold="True" ForeColor="White" />  
                <HeaderStyle BackColor="#1C5E55" Font-Bold="True" ForeColor="White" />  
                <PagerStyle BackColor="#666666" ForeColor="White" HorizontalAlign="Center" />  
                <RowStyle BackColor="#E3EAEB" />  
                <SelectedRowStyle BackColor="#C5BBAF" Font-Bold="True" ForeColor="#333333" />  
                <SortedAscendingCellStyle BackColor="#F8FAFA" />  
                <SortedAscendingHeaderStyle BackColor="#246B61" />  
                <SortedDescendingCellStyle BackColor="#D4DFE1" />  
                <SortedDescendingHeaderStyle BackColor="#15524A" />  
            </asp:GridView>  
            <br />  
            <h4 style="color: White">  
                 DataTable second  Records Before Merging  
            </h4>  
            <asp:GridView ID="GridView2" runat="server" CellPadding="4" ForeColor="#333333" GridLines="None">  
                <AlternatingRowStyle BackColor="White" />  
                <EditRowStyle BackColor="#7C6F57" />  
                <FooterStyle BackColor="#1C5E55" Font-Bold="True" ForeColor="White" />  
                <HeaderStyle BackColor="#1C5E55" Font-Bold="True" ForeColor="White" />  
                <PagerStyle BackColor="#666666" ForeColor="White" HorizontalAlign="Center" />  
                <RowStyle BackColor="#E3EAEB" />  
                <SelectedRowStyle BackColor="#C5BBAF" Font-Bold="True" ForeColor="#333333" />  
                <SortedAscendingCellStyle BackColor="#F8FAFA" />  
                <SortedAscendingHeaderStyle BackColor="#246B61" />  
                <SortedDescendingCellStyle BackColor="#D4DFE1" />  
                <SortedDescendingHeaderStyle BackColor="#15524A" />  
            </asp:GridView>  
            <br />  
        </div>  
        <h4 style="color: White">  
             DataTable second  Records after  Merging  
        </h4>  
        <asp:GridView ID="GridView3" runat="server" CellPadding="4" ForeColor="#333333" GridLines="None">  
            <AlternatingRowStyle BackColor="White" />  
            <EditRowStyle BackColor="#7C6F57" />  
            <FooterStyle BackColor="#1C5E55" Font-Bold="True" ForeColor="White" />  
            <HeaderStyle BackColor="#1C5E55" Font-Bold="True" ForeColor="White" />  
            <PagerStyle BackColor="#666666" ForeColor="White" HorizontalAlign="Center" />  
            <RowStyle BackColor="#E3EAEB" />  
            <SelectedRowStyle BackColor="#C5BBAF" Font-Bold="True" ForeColor="#333333" />  
            <SortedAscendingCellStyle BackColor="#F8FAFA" />  
            <SortedAscendingHeaderStyle BackColor="#246B61" />  
            <SortedDescendingCellStyle BackColor="#D4DFE1" />  
            <SortedDescendingHeaderStyle BackColor="#15524A" />  
        </asp:GridView>  
        <br />  
        </form>  
    </body>  
    </html>

Step 2

Create the records for the table (you can also bind to records from the database).

Scenario

We have a different vendor from which we hire employees and they provide the employee records to our software development team using a web service and our job is to merge all the vendor records into one single data table so we can insert them into our database.
Open the Default.aspx.cs page and create a Vendor table (consider they are provided) as in the following:
DataTable dt = new DataTable();  
           DataRow dr = null;  
           dt.Columns.Add("Id", typeof(int));  
           dt.Columns[0].AutoIncrementSeed = 1;  
           dt.Columns[0].AutoIncrement = true;  
           dt.Columns.Add("Name");  
           dt.Columns.Add("Employer");  
           dr = dt.NewRow();  
           dr["Name"] = "Alexia Pamelov";  
           dr["Employer"] = "LT";  
           dt.Rows.Add(dr);  
  
           DataRow dr2 = null;  
           dr2 = dt.NewRow();  
           dr2["Name"] = "friedrich Eisenhauer";  
           dr2["Employer"] = "Microsoft";  
           dt.Rows.Add(dr2);

Now create the second vendor table (consider they are provided) as in the following:

DataTable dt2 = new DataTable();  
           DataRow dr1 = null;  
          
           dt2.Columns.Add("Id", typeof(int));  
           dt2.Columns[0].AutoIncrementSeed = 1;  
           dt2.Columns[0].AutoIncrement = true;  
           dt2.Columns.Add("Name");  
           dt2.Columns.Add("Employer");  
           dr1 = dt2.NewRow();  
           dr1["Name"] = "Anjali Punjab";  
           dr1["Employer"] = "Goverment";  
           dt2.Rows.Add(dr1);

Now we have a two tables from two different vendors, now we want to merge these two table’s records into one table, then just use the merge method of DataTable and pass the table as in the following:

  //merging first data table into second data table  
             dt2.Merge(dt);  
             dt2.AcceptChanges();
Now from the preceding example it’s clear that we can merge two tables into a single table. Now let us learn about some of the merge rules of DataTables.
  •  If the number of columns do not match the second table

When the number of columns do not match the second table then it creates blank columns for the table for the column(s) that do not match, as in the following

In the preceding you saw that the first data table only has two columns, Id and Employer, and the second table has the three columns Id, Employer and Name so the first table is created with a blank column.
  •  If the data type of a column does not match the second table

The data types must match. If the column names are the same and if the column name in both tables are the same and the data type is different then it shows the following error.

eror

From preceding image it’s clear that it must match the data type of both the columns.
  • If the column name does not match any in the second table

If a column name does not match in the second table then it creates records with a blank in each column that does not match and keeps their own orignal column names as follows.

So let us bind three Grid Views from three tables so we can understand the difference. Now the entire code of Defualt.aspx.cs will look as follows:

using System;  
using System.Collections.Generic;  
using System.Linq;  
using System.Web;  
using System.Web.UI;  
using System.Web.UI.WebControls;  
using System.Data;  
  
namespace MergeMultipleDataTable  
{  
    public partial class Defafult : System.Web.UI.Page  
    {  
        protected void Page_Load(object sender, EventArgs e)  
        {  
            DataTable dt = new DataTable();  
            DataRow dr = null;  
            dt.Columns.Add("Id", typeof(int));  
            dt.Columns[0].AutoIncrementSeed = 1;  
            dt.Columns[0].AutoIncrement = true;  
            dt.Columns.Add("Name");  
            dt.Columns.Add("Employer");  
            dr = dt.NewRow();  
            dr["Name"] = "Alexia Pamelov";  
            dr["Employer"] = "LT";  
            dt.Rows.Add(dr);  
  
            DataRow dr2 = null;  
            dr2 = dt.NewRow();  
            dr2["Name"] = "friedrich Eisenhauer";  
            dr2["Employer"] = "Microsoft";  
            dt.Rows.Add(dr2);  
  
            GridView1.DataSource = dt;  
            GridView1.DataBind();  
            DataTable dt2 = new DataTable();  
            DataRow dr1 = null;  
           
            dt2.Columns.Add("Id", typeof(int));  
            dt2.Columns[0].AutoIncrementSeed = 1;  
            dt2.Columns[0].AutoIncrement = true;  
            dt2.Columns.Add("Name");  
            dt2.Columns.Add("Employer");  
            dr1 = dt2.NewRow();  
            dr1["Name"] = "Anjali Punjab";  
            dr1["Employer"] = "Goverment";  
            dt2.Rows.Add(dr1);  
            GridView2.DataSource = dt2;  
            GridView2.DataBind();  
  
            //merging first data table into second data table  
           dt2.Merge(dt);  
           dt2.AcceptChanges();  
           GridView3.DataSource = dt2;  
           GridView3.DataBind();  
  
        }  
    }  
}
From the preceding example it’s clear that we can merge two tables into a single table.

Notes

  • Download the Zip file from the attachment for the full source code of the application.
  • You can also bind the tables from the database.
  • The data type of a column must be match if the column names are the same.

Summary

I hope this article is useful for all readers, if you have any suggestion then please contact me including beginners also.

IHostAzure.com :: What’s New In ASP.NET 5

What’s New in ASP.NET 5

ASP.NET 5 is a lean .NET stack for building modern web apps. ASP.NET 5 built it from the ground up to provide an optimized development framework for apps that are either deployed to the cloud or run on-premises. It consists of modular components with minimal overhead, so you retain flexibility while constructing your solutions.

Feature ASP.NET 5

  • New flexible and cross-platform runtime
  • New modular HTTP request pipeline
  • Cloud-ready environment configuration
  • Unified programming model that combines MVC, Web API, and Web Pages
  • Ability to see changes without re-building the project
  • Side-by-side versioning of the .NET Framework
  • Ability to self-host or host on IIS
  • New tools in Visual Studio 2015
  • Open source in GitHub

ASP.NET 5 gives you Greater flexibility by being able to run on three runtimes:

  • Full .NET CLR
    The full .NET CLR is the default runtime for projects in Visual Studio. It provides the entire API set and is your best option for backwards compatibility.
  • Core CLR (cloud-optimized runtime)
    The Core CLR is a lean and completely modular runtime for ASP.NET 5 projects. This CLR has been re-designed into components so you have the flexibility to include only those features that you need in your app. You add the components as NuGet packages. When you are finished, your app is dependent only on required features. By re-factoring the runtime into separate components, we can deliver improvements to the components more quickly because each component is updated on its own schedule. The Core CLR is about 11 megabytes instead of around 200 megabytes for the full .NET CLR. The Core CLR can be deployed with your app and different versions of the Core CLR can run side-by-side (both of these advantages are described in greater detail below).
  • Cross-Platform CLR
    We will release a cross-platform runtime for Linux and Mac OS X. When released, this runtime will enable you to develop and run .NET apps on Mac and Linux devices. We will work closely with the Mono community on this effort. Until its release, you can use the Mono CLR for cross-platform development.

By default, new Visual Studio projects use the full .NET CLR. You can specify the Core CLR in the configuration properties for your project.

Host anywhere

ASP.NET 5 enables you to host your app on IIS or self-host your app in your own process. When you target the Core CLR, you can deploy your app with every dependency bundled within the deployment package. Therefore, your app and its dependencies are completely self-contained and no longer dependent on a system installation of .NET. Any type of device or hosting platform is capable of running the app.

Use different versions of .NET side-by-side

When apps on a server depend on a single, system-wide installation of the .NET Framework, all of the apps have to run the same version of .NET. This situation might have created some anxiety for you when considering whether to upgrade to a new version of the .NET Framework. Perhaps, you wanted some of your apps to use the latest version of .NET but you were unsure whether all of your legacy apps would work appropriately with the new version.

Simplify dependency management

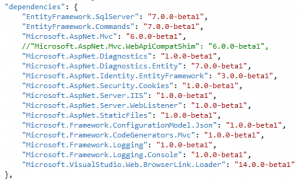
ASP.NET 5 introduces a new, lightweight way to manage dependencies in your projects. You no longer add assembly references to your project instead, you manage dependencies by referencing NuGet packages. You can add NuGet packages through the NuGet Package Manager or you can edit the JSON file (project.json) that lists the NuGet packages and versions used in your project. To add other dependencies, you simply type the name and version number of the NuGet package into your project.json file.

dependenciesIn Visual Studio 2015, IntelliSense assists you with finding the available NuGet packages. The project.json file only includes NuGet packages that you directly added to your project. If you add a NuGet package that is dependent on other packages, those secondary dependencies are loaded but not listed in the project.json file. This approach keeps your project.json file less cluttered and easier to manage. If you remove a NuGet package from project.json, the secondary dependencies are removed too if no other packages need them.

The JSON format makes it easier for you to manage dependencies even when you do not have an available installation of Visual Studio. You can open the project.json file in any type of text editor and make changes, such as updating dependencies for app deployed to the cloud.

IHostAzure.com :: How To Migrating your Access Queries to SQL Server Transact-SQL

This article is an overview of migrating your Microsoft Access queries to SQL Server Transact-SQL (T-SQL) query language, and is intended to be a 101-level introduction.

The target audience is Access developers that are familiar with queries, but not very familiar with SQL Server.

In Scope

  • Basic Info about Access and SQL Server
  • Why You Should Migrate queries
  • Converting Access TABLES To SQL Server
  • Converting Access QUERIES To SQL Server
  • Code Cleanup
  • Naming Conventions
  • Data Type Changes
  • Value Delineation
  • Common Function Changes

Out of Scope

Converting the user interface of an Access application to any application
How to take ugly Access queries and make it easy-to-understand SQL Server queries.
SQL Server Stored Procedures and Functions

Let us begin with the benediction

Everybody repeateth after thee:

  • Converting queries from Access to SQL Server DOES NOT by itself result in better code.
  • I’ve had numerous potential clients that built their own home-grown Access applications, with an undocumented dogpile of queries, and they had the expectation that a couple of my hours to convert to SQL Server would result in beautifully clean manageable code.

Basic Info about Access and SQL Server

  • Access is both a front-end (there is a user interface that can perform actions) and back-end (stores data only) application. SQL Server is ONLY a back-end application. So you can migrate tables and queries to SQL Server, but Forms, Reports, Macros, Modules have to be converted to a front-end application such as VB.NET, C#, Java, or can remain in Access.
  • This also means that SQL server cannot include in queries input prompts like [Enter a start date here] or [Enter your customer number here]. Instead of user interface actions in forms, such as [Forms]![frmDataEntry]![CumstomerID], T-SQL accepts parameters in a similar fashion as Access functions and subs.
  • Access is a file, and can be run either on a pc that has a full (aka full-blown) license of Microsoft Access to allow users to develop / design apps, or runtime license which allows users to run Access apps, but not design them. SQL Server is a server, which means that it must be installed on a separate box, and then users can either develop in it with a client application called SQL Server Management Studio (SSMS), or just connect to its data by installing the correct drivers and having access.
  • Access security (insert drum roll-symbol crash if you prefer) is home grown, and maintained by the developer. And since Access is a file, someone of malicious intent can copy it and walk away. SQL Server security is either SQL Server Authentication which is create your own user names and passwords, or Windows Authentication which integrates with Active Directory to read a user’s network login.

Why You Should Migrate queries from Access to SQL Server

Wouldn’t it be good if…

  • You can write code comments in your own Access queries.
  • You can string along multiple queries in one script without having to save them as individual Access queries.
  • The same Intellisense that helps you code in Access VBA also existed in queries?
  • You can create temporary table(s) that can be re-used multiple times.
  • You can dim / declare your own single-value variables / parameters, and use them throughout multiple queries.
  • You can perform DAO/ADODB-like recordset loops / cursors within a query?
  • You can ‘tune’ your queries for optimum performance, identifying roadblocks?

Converting Access TABLES to SQL Server

Easy
To date there is no Access to SQL wizard other than the SQL Server Import Wizard.
Until then, you’ll have to manually do something that goes like this:

  1. Go into SQL Server, click on the database, then right-click:Tools, Import, and follow the steps to import all tables into your SQL Server database.
  2. Go into Access, Linked Table Manager, and follow the steps to connect to SQL Server and link to all of your tables. Access will prefix these new tables with dbo_, or whatever the schema is.
  3. Save the Access file to an archive location somewhere.
  4. Delete the local Access table.
  5. Renamed the linked tables by removing the dbo_ prefix so that the names are exactly the same as the old local tables.
    Converting Access QUERIES to SQL Server

There is no migration tool, so you have to do it yourself.