Cheap and Reliable Hosting :: How To Draw Route Between Current Location and Destination On Google Maps in ASP.NET

IHostAzure.com | Cheap and Reliable ASP.NET Hosting. Today I will explains about how to draw route between current location and destination on google maps in ASP.NET. Let me to show you.

Please following this code

The following is my aspx:

<%@ Page Language="C#" AutoEventWireup="true" CodeFile="Default.aspx.cs" Inherits="_Default" %>  
<!DOCTYPE html PUBLIC "-//W3C//DTD XHTML 1.0 Transitional//EN" "http://www.w3.org/TR/xhtml1/DTD/xhtml1-transitional.dtd">  
<html xmlns="http://www.w3.org/1999/xhtml">  
<head runat="server">  
    <title>Search Route Direction</title>  
    <script type="text/javascript" src="https://maps.googleapis.com/maps/api/js?sensor=false"></script>  
    <script type="text/javascript" src="https://maps.googleapis.com/maps/api/js?key=AIzaSyC6v5-2uaq_wusHDktM9ILcqIrlPtnZgEk&sensor=false">  
    </script>  
    <%--Getting User Current Location--%>  
    <script type="text/javascript">  
        if (navigator.geolocation) {  
            navigator.geolocation.getCurrentPosition(success);  
        } else {  
            alert("There is Some Problem on your current browser to get Geo Location!");  
        }  
        function success(position) {  
            var lat = position.coords.latitude;  
            var long = position.coords.longitude;  
            var city = position.coords.locality;  
            var LatLng = new google.maps.LatLng(lat, long);  
            var mapOptions = {  
                center: LatLng,  
                zoom: 12,  
                mapTypeId: google.maps.MapTypeId.ROADMAP  
            };  
            var map = new google.maps.Map(document.getElementById("MyMapLOC"), mapOptions);  
            var marker = new google.maps.Marker({  
                position: LatLng,  
                title: "<div style = 'height:60px;width:200px'><b>Your location:</b><br />Latitude: "  
                            + lat + +"<br />Longitude: " + long  
            });  
            marker.setMap(map);  
            var getInfoWindow = new google.maps.InfoWindow({ content: "<b>Your Current Location</b><br/> Latitude:" +  
                                    lat + "<br /> Longitude:" + long + ""  
            });  
            getInfoWindow.open(map, marker);  
        }  
    </script>  
    <%--Getting Route Direction From User Current Location to Destination--%>  
    <script type="text/javascript">  
        function SearchRoute() {  
            document.getElementById("MyMapLOC").style.display = 'none';  
  
            var markers = new Array();  
            var myLatLng;  
  
            //Find the current location of the user.  
            if (navigator.geolocation) {  
                navigator.geolocation.getCurrentPosition(function(p) {  
                    var myLatLng = new google.maps.LatLng(p.coords.latitude, p.coords.longitude);  
                    var m = {};  
                    m.title = "Your Current Location";  
                    m.lat = p.coords.latitude;  
                    m.lng = p.coords.longitude;  
                    markers.push(m);  
                    //Find Destination address location.  
                    var address = document.getElementById("txtDestination").value;  
                    var geocoder = new google.maps.Geocoder();  
                    geocoder.geocode({ 'address': address }, function(results, status) {  
                        if (status == google.maps.GeocoderStatus.OK) {  
                            m = {};  
                            m.title = address;  
                            m.lat = results[0].geometry.location.lat();  
                            m.lng = results[0].geometry.location.lng();  
                            markers.push(m);  
                            var mapOptions = {  
                                center: myLatLng,  
                                zoom: 4,  
                                mapTypeId: google.maps.MapTypeId.ROADMAP  
                            };  
                            var map = new google.maps.Map(document.getElementById("MapRoute"), mapOptions);  
                            var infoWindow = new google.maps.InfoWindow();  
                            var lat_lng = new Array();  
                            var latlngbounds = new google.maps.LatLngBounds();  
                            for (i = 0; i < markers.length; i++) {  
                                var data = markers[i];  
                                var myLatlng = new google.maps.LatLng(data.lat, data.lng);  
                                lat_lng.push(myLatlng);  
                                var marker = new google.maps.Marker({  
                                    position: myLatlng,  
                                    map: map,  
                                    title: data.title  
                                });  
                                latlngbounds.extend(marker.position);  
                                (function(marker, data) {  
                                    google.maps.event.addListener(marker, "click", function(e) {  
                                        infoWindow.setContent(data.title);  
                                        infoWindow.open(map, marker);  
                                    });  
                                })(marker, data);  
                            }  
                            map.setCenter(latlngbounds.getCenter());  
                            map.fitBounds(latlngbounds);  
                            //***********ROUTING****************//  
                            //Initialize the Path Array.  
                            var path = new google.maps.MVCArray();  
                            //Getting the Direction Service.  
                            var service = new google.maps.DirectionsService();  
                            //Set the Path Stroke Color.  
                            var poly = new google.maps.Polyline({ map: map, strokeColor: '#4986E7' });  
                            //Loop and Draw Path Route between the Points on MAP.  
                            for (var i = 0; i < lat_lng.length; i++) {  
                                if ((i + 1) < lat_lng.length) {  
                                    var src = lat_lng[i];  
                                    var des = lat_lng[i + 1];  
                                    path.push(src);  
                                    poly.setPath(path);  
                                    service.route({  
                                        origin: src,  
                                        destination: des,  
                                        travelMode: google.maps.DirectionsTravelMode.DRIVING  
                                    }, function(result, status) {  
                                        if (status == google.maps.DirectionsStatus.OK) {  
                                            for (var i = 0, len = result.routes[0].overview_path.length; i < len; i++) {  
                                                path.push(result.routes[0].overview_path[i]);  
                                            }  
                                        } else {  
                                            alert("Invalid location.");  
                                            window.location.href = window.location.href;  
                                        }  
                                    });  
                                }  
                            }  
                        } else {  
                            alert("Request failed.")  
                        }  
                    });  
                });  
            }  
            else {  
                alert('Some Problem in getting Geo Location.');  
                return;  
            }  
        }  
    </script>   
</head>  
<body>  
    <form id="form1" runat="server">  
    <table style="border: solid 15px blue; width: 100%; vertical-align: central;">  
        <tr>  
            <td style="padding-left: 20px; padding-top: 20px; padding-bottom: 20px; background-color: skyblue;  
                text-align: center; font-family: Verdana; font-size: 20pt; color: Green;">  
                Draw Route Between User's Current Location & Destination On Google Map  
            </td>  
        </tr>  
        <tr>  
            <td style="background-color: skyblue; text-align: center; font-family: Verdana; font-size: 14pt;  
                color: red;">  
                <b>Enter Destination:</b>  
                <input type="text" id="txtDestination" value="" style="width: 200px" />  
                <input type="button" value="Search Route" onclick="SearchRoute()" />  
            </td>  
        </tr>  
        <tr>  
            <td>  
                <div id="MyMapLOC" style="width: 550px; height: 470px">  
                </div>  
                <div id="MapRoute" style="width: 500px; height: 500px">  
                </div>  
            </td>  
        </tr>  
    </form>  
</body>  
</html>

 Now run the application.

I hope this article helpful for you. Happy Coding 🙂

Best Recommendation ASP.NET 5 Hosting

ASPHostPortal.com

asp

Cheap And Reliable Hosting :: How to Loading Sequence of Master Page, Contents Page and User Control in ASP.NET 5

IHostAzure.com| Cheap and Reliable Hosting. In this article I will show the loading process sequence of a Master Page that contains a Contents Page and that Contents Page has a User Control in ASP.NET 5

Step 1:

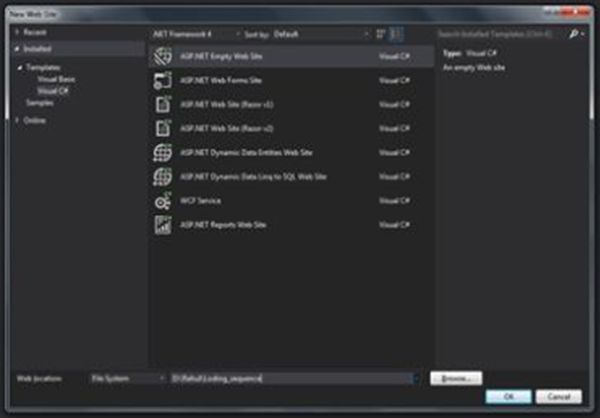
  • Create a website named “Loading_sequence”.

   empty website

Step 2:

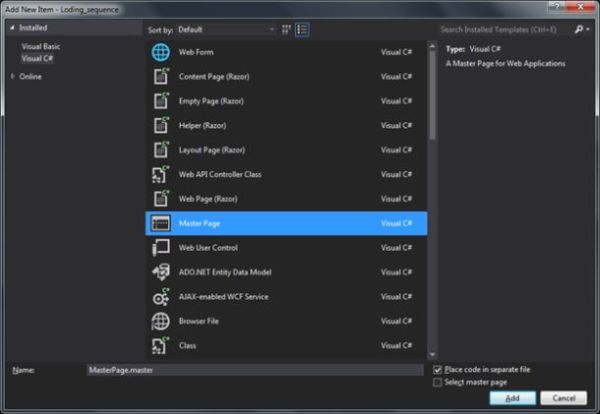
  • Add a Master Page named “MasterPage.master” within it by right-clicking on the website in “Solution Explorer” then choose “Add” -> “Add New Item”. master page
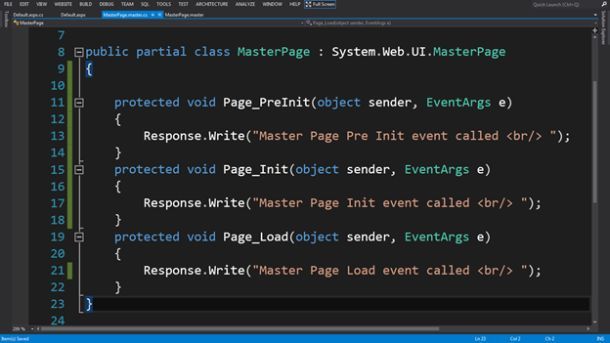
  • Create some events in the “.cs” file of the Master Page and add a “response.write()” method with unique text for monitoring the process of execution.
        protected void Page_PreInit(object sender, EventArgs e)  
        {  
           Response.Write("Master Page Pre Init event called <br/> ");  
        }  
        protected void Page_Init(object sender, EventArgs e)  
        {  
           Response.Write("Master Page Init event called <br/> ");  
        }  
        protected void Page_Load(object sender, EventArgs e)  
        {  
           Response.Write("Master Page Load event called <br/> ");  
        }  

    cs code

Step 3:

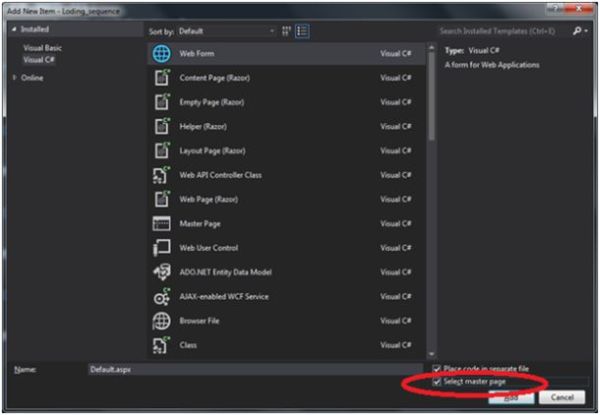
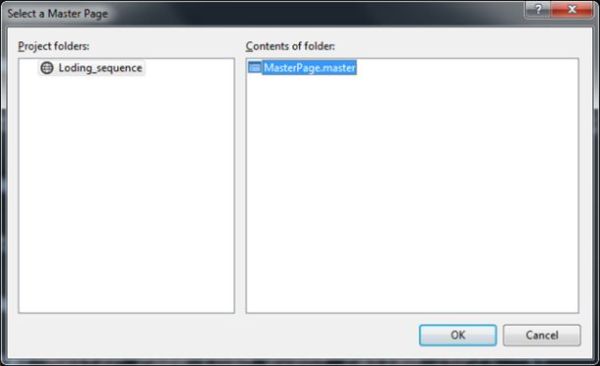
  • Add a Contents Page named “Default.aspx” within it by the right-clicking on the website in Solution Explorer then choose “Add” -> “Add New Item” and check the “Select master page” checkbox to attach the Master Page. web form
  • Select the Master Page name that you want to attach. select master page
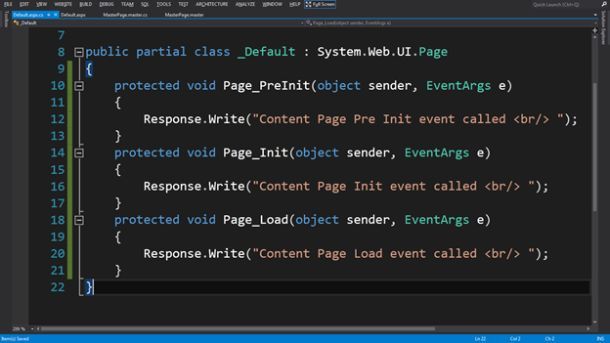
  • Create some events in the “.cs” file of the Contents Page and add a “response.write()” method with unique text by which we can monitor execution as written in the Master Page.


    protected void Page_PreInit(object sender, EventArgs e)  
    {  
       Response.Write("Content Page Pre Init event called <br/> ");  
    }  
    protected void Page_Init(object sender, EventArgs e)  
    {  
       Response.Write("Content Page Init event called <br/> ");  
    }  
    protected void Page_Load(object sender, EventArgs e)  
    {  
       Response.Write("Content Page Load event called <br/> ");  
    }

    response page

Step 4:

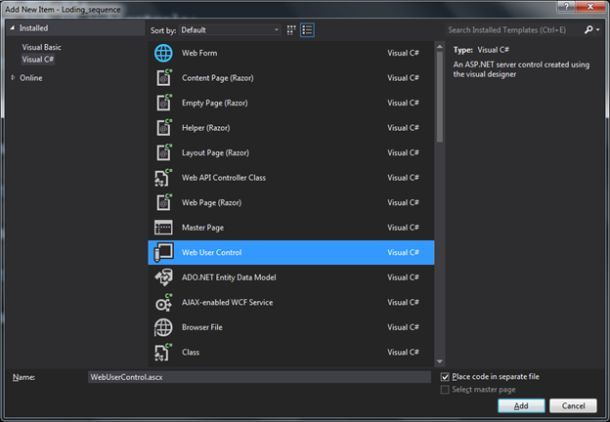
  • Add a Web User Control named “WebUserControl.aspx” within it by right-clicking on the website in Solution Explorer then choose “Add” -> “Add New Item”.web user control
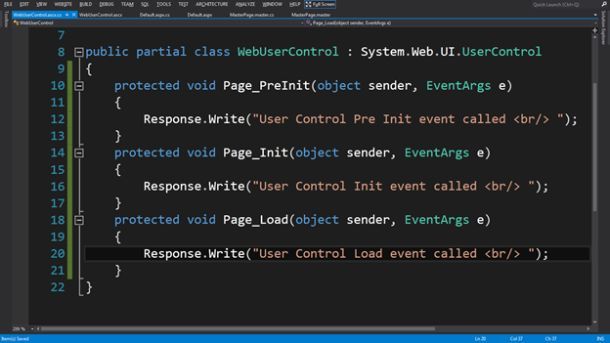
  • Create some events in the “.cs” file of the Web User Control and add a “response.write()” method with unique text for monitoring the execution as written in the Master Page and the Contents Page.


        protected void Page_PreInit(object sender, EventArgs e)  
        {  
           Response.Write("User Control Pre Init event called <br/> ");  
        }  
        protected void Page_Init(object sender, EventArgs e)  
        {  
           Response.Write("User Control Init event called <br/> ");  
        }  
        protected void Page_Load(object sender, EventArgs e)  
        {  
           Response.Write("User Control Load event called <br/> ");  
        }  

    User Control Load event

Step 5:

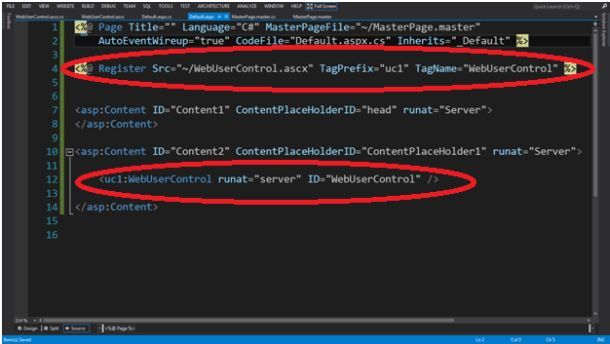
  • Add the Web User Control to the Contents Page then “Register Tag” and write the code to access the control by the “TagPrefix” and “TagName”.

   TagPrefix

Step 6:

  • Run the website to see the output.

  output

I hope this article helpful for you.

No #1 Recommended ASP.NET 5 Hosting

ASPHostPortal.com

ASPHostPortal.com  is the leading provider of Windows hosting and affordable ASP.NET Hosting. ASPHostPortal proudly working to help grow the backbone of the Internet, the millions of individuals, families, micro-businesses, small business, and fledgling online businesses. ASPHostPortal has ability to support the latest Microsoft and ASP.NET technology, such as: WebMatrix, WebDeploy, Visual Studio 2015, .NET 5/ASP.NET 4.5.2, ASP.NET MVC 6.0/5.2, Silverlight 6 and Visual Studio Lightswitch, ASPHostPortal guarantees the highest quality product, top security, and unshakeable reliability, carefully chose high-quality servers, networking, and infrastructure equipment to ensure the utmost reliability.

HostForLIFE.eu

HostForLIFE.eu guarantees 99.9% uptime for their professional ASP.NET hosting and actually implements the guarantee in practice. HostForLIFE.eu is the service are excellent and the features of the web hosting plan are even greater than many hosting. HostForLIFE.eu offer IT professionals more advanced features and the latest technology. Relibility, Stability and Performance of  servers remain and TOP priority. Even basic service plans are equipped with standard service level agreements for 99.99% uptime. Advanced options raise the bar to 99.99%. HostForLIFE.eu revolutionized hosting with Plesk Control Panel, a Web-based interface that provides customers with 24×7 access to their server and site configuration tools.

DiscountService.biz

DiscountService.biz is The Best and Cheap ASP.NET Hosting. DiscountService.biz was established to cater to an under served market in the hosting industry web hosting for customers who want excellent service. DiscountService.biz guarantees the highest quality product, top security, and unshakeable reliability, carefully chose high-quality servers, networking, and infrastructure equipment to ensure the utmost reliability. DiscountService.biz has ability to support the latest Microsoft and ASP.NET technology, such as: WebMatrix, WebDeploy, Visual Studio 2015, .NET 5/ASP.NET 4.5.2, ASP.NET MVC 6.0/5.2, Silverlight 6 and Visual Studio Lightswitch. DiscountService.biz is devoted to offering the best Windows hosting solution for you.

Cheap And Reliable Hosting :: Create Console Application ASP.NET 5 Using Visual Studio 2015

We know Visual Studio 2015 Preview has been released, it has been announced by Microsoft on November 12, 2014 at the Visual Studio Connect() event in New York, USA. With this new release of Visual Studio 2015 many new features have been added but this article is only about the two new ways to create projects with ASP.NET 5 under the Web node that is in Visual Studio 2015 Preview.

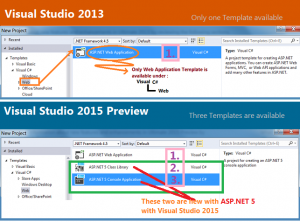
ASP.NET 5 came with Visual Studio 2015 Preview. Now we have a new way to create a Console Application project under Visual C# \Web Template. The following are the two new templates for ASP.NET 5 but this article only explains:

Comparison of ASP.NET 5 and ASP.NET 4.5 Project Templates

22

Now use the following procedure to create a Console Application using the ASP.NET 5  project template in Visual Studio 2015 Preview.

Step I

To create a new Console Application using the ASP.NET 5 Console Application project template use the following procedure:

“File” -> “New” -> “Project…”

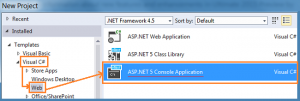
Now in the New Project window the following project template will be shown in which we will select the language Visual C# and select Web from the child menu of Visual C#. It will look like as in the following figure.

33

In the preceding project template we can see that now we have the three types of projects, in other words:

  • ASP.NET Web Application
  • ASP.NET 5 Console Application
  • ASP.NET 5 Class Library

But this article only explains ASP.NET 5 Console Application. So select ASP.NET 5 Console Application and continue to create this project.

Step II

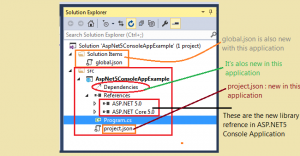
Now we can see a quite different look of Solution Explorer in comparison to other older version. Let’s see the following figure that represents the new architecture of projects.

44

In the preceding picture we are watching various new files that were not available with the older version Console Application. Let’s see the following short explanation that describes the new files and their roles.

project.json

This file (project.json) is synchronized with Solution Explorer, it contains the information about dependencies (assemblies references that are being used by this application).

Note: when we remove any dependency from the project then this file will be updated automatically. It behaves very similar to web.config in web applications.

This file contains the following default code that contains the information of version, dependencies, framework and the two new assembly references.

{  
    "version": "1.0.0-*",  
    "dependencies": {  
    },  
    "commands": {   
        "run" : "run"  
    },  
    "frameworks" : {  
        "aspnet50" : { },  
        "aspnetcore50" : {   
            "dependencies": {  
                "System.Console": "4.0.0-beta-22231"  
            }  
        }  
    }   
}

In the preceding code we can see that only one dependency is showing, which is:

“System.Console” :”4.0.0-beta-22231” – it is a new assembly that is added with .NET Framework 5 in Visual Studio 2015.

global.json

This file contains the information about solutions. In other words it keeps the definition about which is the solution folder for the source files of the current application. When we create a new project in an ASP.NET 5 Console Application, we have the following default line of code in the global.json file.

    {  
      "sources": [ "src", "test" ]  
    }  

Here src represents the folder that contains all the project’s files that contain the source code that make up our application.

Step III

Now we will write some program code to test the application. So for this program we will write a simple program to display the counting table. Let’s see how we write this code in the Program.cs file.

    using System;   
    using System.Console;   
    namespace AspNet5ConsoleAppExample  
    {  
        public class Program  
        {  
            public void Main(string[] args)  
            {  
                Console.WriteLine("\nThis is an example program written \nin ASP.NET 5 !");  
                  Console.WriteLine("_________________________________________\n");  
                //  
                ShowCountingTable(1, 100);  
                Console.ReadLine();  
            }  
            //A program code to print 1-100  
            private void ShowCountingTable(int startPont, int endPoint)  
            {  
                int i = startPont;    
                int symbolCount = 0;  
                while (startPont <= endPoint)  
                {  
                    if (symbolCount <= 10)  
                    {  
                        symbolCount++;  
                        Write(startPont + "\t");  
                        if (symbolCount == 10)  
                        {  
                            symbolCount = 0;  
                            WriteLine("");  
                        }  
                        startPont++; 
                    }  
                }  
            }  
        }   
    }  

Step IV

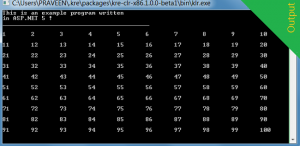
Now execute the application to see the output. After successful execution we will see the following output.

Output Window

55


Cheap And Reliable Hosting :: Cheap And Reliable ASP.NET ASPHostPortal Vs SmarterASP.NET

Find the  cheap and reliable ASP.NET Hosting company is not easy , therefore we need to compare prices, features of several hosting providers before choosing a cheap and reliable hosting.

We know that finding a cheap and reliable asp.net hosting is not an easy task and it is very important for your web application . because it is here we will compare the two hosting providers that ASPHostPortal and SmarterASP.NET , we decided to write a review about them . We will analyze the price , the features of hosting , technical support , and also the speed of the server .

How to Choose the Best Web Hosting Provider?

Without high-quality web hosting, your ability to run a successful website is going to be seriously hindered. One of the worst mistakes you can make is to choose a web hosting provider at random. If there’s a situation that calls for some thought, consideration and research, choosing a web hosting provider is it. There’s a dizzying array of web hosting providers competing for your business. How can you pinpoint the best one? Start by keeping the following points in mind.

Technical Specifications

  • The first thing you need to do when shopping for a webhost is to evaluate your disk space and bandwidth needs. If your site will feature a lot of graphics, dozens of pages and get a lot of traffic, you’re going to need decent amounts of bandwidth and disk space. Unlimited plans are available, and they make life easier. If your site is going to be simple and not generate a huge amount of traffic, you should be able to get away with smaller amounts of disk space and bandwidth.

Get a Feel for Pricing & Value

  • Some people choose web hosting providers strictly based on price. That’s not a great strategy, but you should definitely take pricing into consideration. The best providers offer options for every budget. In some cases, signing up for long subscriptions will qualify you for extra discounts.

Always Investigate Support and Customer Service

  • Even if you’re a whiz at setting up websites, it’s nice to know that help is available whenever you need it. Confirm that the web hosting provider has 24/7 support. Make sure that there are several ways to get support too. The most reliable providers provide support through email, phone and online chat.

ASPHostPortal vs SmarterASP.NET ASP.NET Hosting Features

ASPHostPortal and SmarterASP.NET include latest versions of Windows server, MSSQL, ASP.NET, ASP.NET MVC and some other advanced Microsoft technologies. To know their strength clearly, we list the main features in the following table.

[pricingtable id=’364′ ]

ASPHostPortal vs SmarterASP.NET ASP.NET Plan

ASPHostPortal offers 4 shared asp.net hosting plan named Host Intro, Host One, Host Two, and Host Three and most of clients start from their Host One plan. The prices of plans start from $1.00/month, $5.00/month, $9.00/month, and $14.00/month.

In other hand, SmarterASP.NET has 3 ASP.NET shared hosting packages named Basic, Advance, and Premium which start from $2.95/month, $4.95/month, and $7.95/month. If we compare the price, they are almost same in price and they are windows hosting provider that offer affordable ASP.NET hosting solution.

Both of them also offers money back guarantee if customers don’t satisfy with their services. ASPHostPortal guarantees 30 days money back guarantee and SmarterASP.NET has 60 days money back guarantee.

Conclusion

Both ASPHostPortal and SmarterASP.NET are great ASP.NET hosting solution. For features, they offer rich features, for pricing and money back policy, SmarterASP.NET offer advantages than ASPHostPortal. But, if you are webmasters that require high speed, than ASPHostPortal is the best option because ASPHostPortal a Microsoft Golden hosting partner has been offering well priced Windows and ASP.NET hosting plans for many years. The company also offers low priced enterprise-level hosting plans by focusing their resources on needs by ASP.NET Windows’s developers. ASPHostPortal is to offer the best web hosting value to their clients by offering products and solution in an efficient and effective way.